


Notes concerning Future Indicative
Worsfold Software’s Careers package is now available
Version 1.2.20 Released 5th June 2013
![]() the new version here
the new version here
Latest changes to Worsfold Software’s Future Indicative software
Version 1.2.20 Released 5th June 2013
Some enhancements to Future Indicative
Following a training visit to Logan Park High School in Dunedin, where they are making excellent use of the ‘Appointments’ utility in Future Indicative, a number of enhancements have been made, several of which are in this area.
-
- In the appointments analysis multiple contiguous appointments for the same student now count a one.
- You can now analysis appointments by purpose (as well as by gender and ethnicity)
- Deleting an appointment now also deletes subsequent contiguous appointments for the same student.
- In a recent update I introduced the ability to memorise a week’s appointments and then you were able to apply the memorised set to any future week by clicking the button at the top of each week as it was displayed. This was too cumbersome. Now, when you ‘memorise’ a weeks appointments (by clicking the button at the top of the week’s display) they are AUTOMATICALLY and IMMEDIATELY added to every remaining week of the current year. This process will NOT override existing student appointments.
- A request was made to be able to jump from a student’s appointment screen directly to the student’s data screens. There is already a button on the appointment screen which allows you to do this.
- I’ve added a new facility (from our Star package) which enables you to ‘Compact and repair’ your database. This is a new button under Utilities. This will make TWO copies of your database (one for extra security). It will then compact and repair one of the copies and, if successful, will replace your current database with the compacted one. This is useful as, each year, students are removed from the database but this process does not actually reduce the database in size – so it grows and grows. Also on this page is an option to remove any appointments created in previous years. This, too, allows you to keep the size of your database as small as possible.
- User-defined lists
- You may now report on the ‘number of appointments’ for each student.
- You may now print UD lists by class or by group (as well as by year)
Version 1.2.18 Released 14th March 2013
There have been a few minor changes over the last 10 months - but we've finally added a couple of new features that people have been asking for - so here's a new release.
1. There is a new printing routine which allows you to globally generate individual student text summaries of their FI details or NZQA details or both. You can do it by class, by group or by year. (You've always been able to do these for individual students and now you can generate them for several students at a time). Access this via a new printing routine button.
2. If you are using the appointments scheduler and you block out the same time slots each week then you can now go to a week display and memorise the timeslots there - and then move to a future week and have them all added to the new week. This is done via new buttons at the top of the 'week' display.
3. For some reason the printing routine seemed to be very slow if you printed a second or more document via the printing utility. This has been fixed - so printing should be rather faster now.
Version 1.2.13 Released 30th May 2012
A minor change to solve a small problem experienced by one school. (Crashed - could not find column 151 when accessing a student)
Version 1.2.11 Released 30th April 2012
Following visits to several schools up north a number of enhancements have been made at their request. These include :
1. The import, from MUSAC, of each student's vertical group - and the analysis printouts can now be printed by vertical group - as well as by year and by horizontal group. As far as Kamar is concerned, I suspect that the currently imported 'class' is, in fact, their vertical group already.
2. I've changed the background colour of the Student module splash screen from blue to green - to make the distinction between that and the main program more obvious.
3. Due to the recalcitrant behaviour of the odd student who is want to enter unsuitable choices I've added the ability to disable the editing rights for individual students. This is done via a new tick box towards the bottom of their personal details. Of course this is not displayed on the student's version of the student screen.
4. There is a new button under Configuration which enables you to edit the choice categories directly, rather than having to do it via a student's screen. This makes it easy for you to check for and remove unsuitable choices.
5. A fault in the audit trail (which was not reporting new categories added by students) has been corrected.
6. The NZQA analysis of results has been modified to reflect the new processes for 2012. This affects the way literacy and numeracy for both level 1 and UE are calculated.
Version 1.2.10 Released 29th August 2011
Several schools have reported that they have been unable to get Future Indicative to run on their new Windows 7 64-bit machines. This nasty proble has now been solved. Installing the update (1.2.10) fixes the problem but, if schools require a new CD, then they may obtain one, free of charge by contacting Worsfold Software Ltd.
Version 1.2.9 Released 29th August 2011
A fault has been found in the process which imports standards details from GATEWAY when importing from the student screen. This has been repaired.
Version 1.2.8 Released 28th June 2011
On some computers a crash was occuring when clicking on Printing facilities/ Pre-designed lists
A modification has also been made to the Gateway import routines to prevent students without NSI entries receiving spurious results from other students.
Version 1.2.7 Released 24th April 2011
One school reported a crash when accessing a student. The fault turned out to be associated with a fault in the design of the Student Work Experiences part of the database. It is unlikely that any other school will experience this crash but, just in case, version 1.2.7 includes a routine to repair the fault.
Version 1.2.6 Released 12th April 2011
A number of minor problems have been repaired.
In some instances where students had standards with 'X' results (i.e. student did not take this standard') then the standard was being removed from the display (correct) along with possibly another standard with no result (incorrect).
Schools just starting with Future Inidcative were experiencing a problem with the 'starting' database.
Version 1.2.5 Released 8th March 2011
Two schools have reported a problem when transferring students who have left to the archive database. I've revisited this area of the program and strengthened a couple of areas that were, in some cases, causing faults.
Version 1.2.4 Released 17th February 2011
A nasty fault in the new version has been fixed. I'd ngelected to specify the new password for the database when students are attempting to enter.
Version 1.2.3 Released 17th February 2011
At the Cate conference in Auckland we received a number of requests for modifications to Future Indicative. The following changes have been made :
1. When you first enter the new version a message will appear on the splash screen showing you that the file of NZQA standards is being imported into the FI database. This takes a few moments and includes the Internally/Externally assessed flag on each standard. After this is complete each students’ standards are processed, adding the I/E flag to their result. Once this process is complete you will automatically proceed to the main screen. This process only happens once, of course.
2. There is a new Utility labeled ‘Update NZQA standards’ which will be run each time a new version of the standards is received from NZQA. This will happen automatically each time you load a new version of the standards file.
3. A major new feature has been added to the printing utility. This allows you to design documents related to students (and employers (in the Work Experience section).
The first of the two buttons allows you to design a document. Cl;ick the first and the following screen will appear.
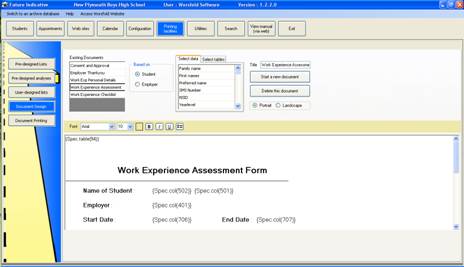
Five sample documents are provided and you can see from the selected one above that they include codes – which are replaced by the relevant text when you print the document for a particular student / employer.
The first thing on the screen is the list of existing documents. You can select an existing document to edit it to your own needs or you can design new documents of your own.
The second item is the choice of student or employer. You can jump backwards and forwards between these as you are designing the document (to select the relevant codes). However, if you include codes for an employer then you MUST switch back to ‘Employer’ after you have completed entering ‘Student’ codes.
The next item is the Code selector. When you get to the point in your document where you wish to insert a code then select it from the list shown. There is a second tab which offers some non-person specific items such as the logo.
Finally, on the right hand side, is where you Start a new Document (and provide its title) and select Portrait or Landscape.
The bottom half of the screen show the document being designed.
A hint: If you use the Tab key to tab across the document then please follow that with a space if you are then inserting a code. For some reason (which I’ve been unable to discover) the deciphering routine gets confused when a Tab is followed y a code.
The last button on the left takes you to the document printing routine.
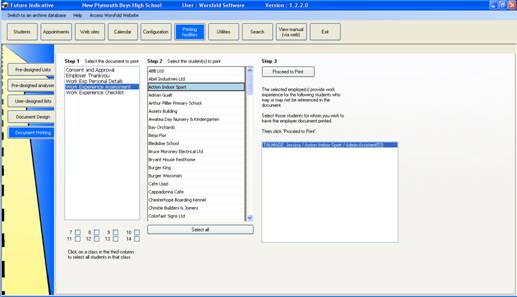
Select the document which you wish to print from the list on the left.
If you’ve based the document on an Employer then te employers will be listed, otherwise students will be listed.. If you select an employer then his or her students will be listed. Make your selection(s) and press ‘Proceed to print’. This will take you to the document preview screen :
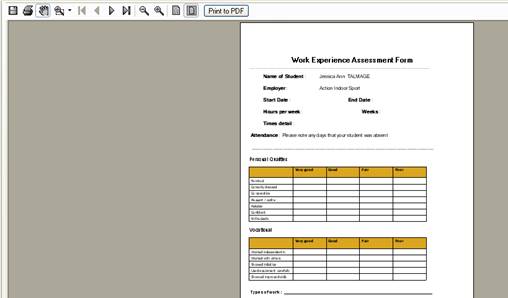
On this screen you can preview the document which may have more than one page. Once happy you can click on the small printer in the top left hand corner to print the document, or you can click the ‘Print to pdf’ button to follow that option.
4. You can add a logo to your documents.
Go to Configuration and click on the new button labeled ‘Document Logo’. The following screen will be revealed.
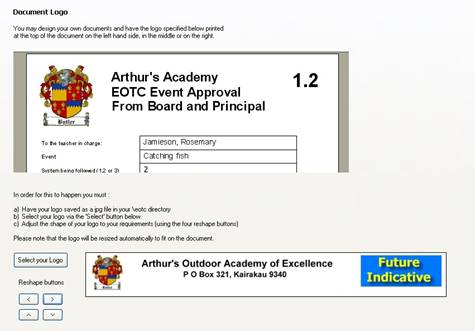
Click the button labeled ‘Select your logo’ and select the file (which must be a .jpg in your \fi directory). You chosen logo will then be displayed at the bottom of the screen and you can use the four arrow buttons to modify its shape and size.
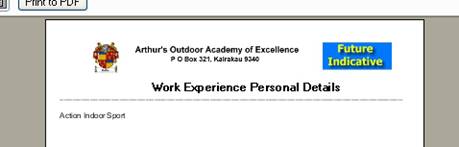
Subsequently, if you include the logo code in a document then the logo will appear as requested. An example is shown below.
5. There is a new button under ‘Configuration’ labeled ‘Calendar’ via which you may enter the date, the event, a note, a booking required flag, a ‘request to’ field. You may, if you so wish, enter ‘Yes’ in the ‘Booking Required’ field and then use the popup menu in the ‘request to’ field to select the name of the person to whom requests should be made. What happens then? See the next item.
6. There is now a new main button labeled ‘Calendar’. If you have entered upcoming events via the Configuration area described in the preceding item then these events will be listed on the screen. This screen is also available to students via the student module. If you click in the Last column (labeled ‘Click to …’) then a window will pop up enabling you to send a message to the person whose name has been recorded as the ‘booking agent’ via configuration.
The next time that person enter FI they will receive any messages sent to them. This is not an email system but it works in a similar way, purely within FI.
7. The students’ ‘Destination’ details are now included in the Search utility.
8. The audit trail of changes made by students can now be sorted by clicking in a column heading to sort on that column.
9. If you are entering students’ goals and you click in the comment are (having entered a date) then a pop-up comment area while appear into which you can type the comment.
10.
The newly created Work Experiences area has been activated in the student module (FIStudent) and a corresponding right has been added to the ‘Student Rights’ area in Configuration.
11. On the students’ NZQA screen an further column has been added to indicate which standards are Internally assessed as opposed to those Externally assessed.
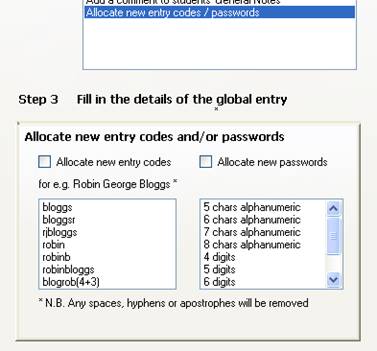
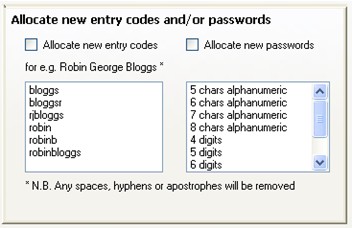
12. There is a new password possibility under ‘Utilities’ / ‘Global data entry’.
If you elect to ‘Allocate new entry codes / passwords’ then you may select blogrob – which is the first four letters of the family name followed by the first three letters of the first names, as shown in the example below.
13. Earlier a ‘yellow dot’ system was introduced to signal to you that a student had added data to their record. This yellow dot appears alongside their name in the student selector. (The process must be ‘switched on’ via ‘Configuration / Global settings’)
If you click on a yellow dot then you will be able to see the changes that the student has made. The process has now been completed – so that you may now remove the notification. This does NOT remove the data on the student – just from the notification list.
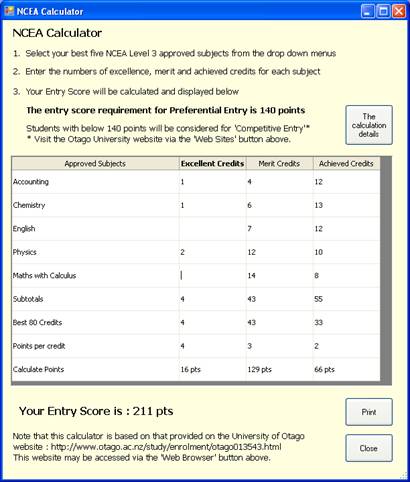
14. On the student’s NZQA screen there is now a calculator. This is based on the Preferential Entry calculator on the University of Otago website – the link for which is at the bottom of the calculator screen.
To use the calculator, enter up to five subjects (selected from the popup list) followed by the number of credits gained in each of the columns (Excellence, Merit and Achieved) and the student’s score will be displayed at the bottom of the screen. An example of the process is shown below.
15. Finally, the Future Indicate database is now passworded. As you run the new version of the program (fi.exe) a password will be added to the database. This will have no effect on those using the program but, should anyone (e.g. a devious student) use Windows Explorer to find the database in the \fi directory then he or she will not be able to view the database without knowing the password.
Should you need to know the password then a phone call to me will be required.
Version 1.0.18 Released 16th November 2010
1. A small fault remaining in the year 9 Values area has been found and fixed..
Version 1.0.17 Released 17th August 2010
1. One nasty fault in the NZQA update routine which only affects MUSAC users has been fixed. It was not calculating Literacy and Numeracy passes correctly. I've had positive feedback from two schools trialling this new version, so all should be well now.
2. I've added a whole lot of further possibilities for the format of the student's photograph name. PC labels have been added for thos who require that and a whole range of name possibilities have also been added.
3. Student trying to scroll down in their NZQA page couldn't unless they had 'edit' rights. Now they should be able to as long as they have 'View' rights.
Version 1.0.16 Released 21st July 2010
Woops - version 1.0.15 accidentally included parts of the version 14 update - and this caused a problem or two in one schools. To get around this I've recompiled everything as version 1.0.16. My apologies for any confusion caused.
Version 1.0.15 Released 19th July 2010
Over the past few weeks a number of minor faults (and a couple of major ones) have been identified and repaired in Future
The following changes have been made to Future Indicative over the holidays following the seminars around the North Island in May/June.
Students
1 Under each student’s Achievement s and Goals Action Plan’ at each year level you can now either type in your entry directly (as before) or you can choose from a popup list of ‘achievements’ as shown in the illustration below.
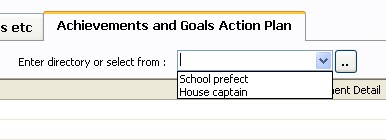
Use the ‘dots’ button to add new entries to the menu list.
2 Students’ photographs
A small area on the student’s basic data screen has been used to display a photograph of the student.
If you click on the photograph a dialogue will appear which you can use to identify the student’s photograph file elsewhere on your machine…. Presumably in a directory of student photographs maintained by your Student Management System e.g. MUSAC.

If your students’ photographs have been named using either their sms number or their nsid then it is possible to link to all photographs globally. This is done via configuration and is discussed in that area below.
3 The new ‘Work Experience’ section is now active and is shown in the screen below.
To add a new employer click on the ‘dots’ button alongside the employer pulldown list.
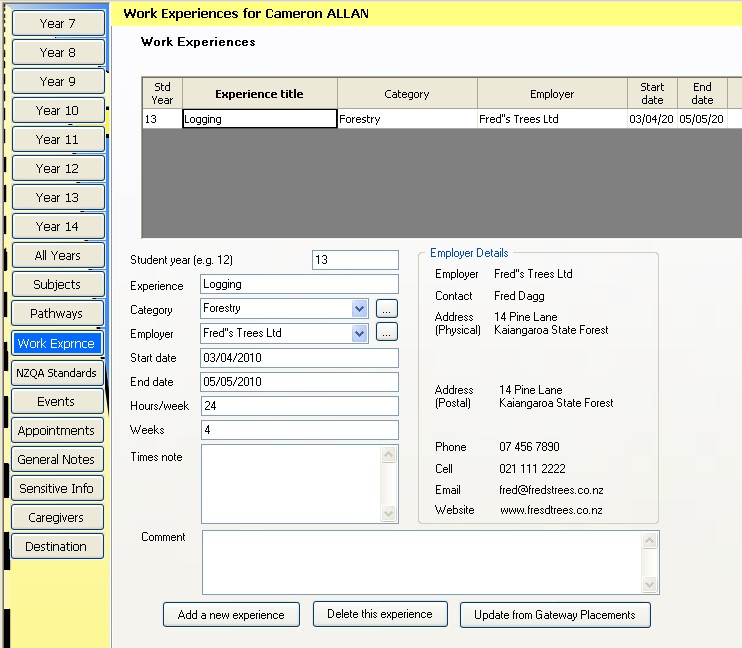
Access to this screen has also been added to the student module so that they can view/edit their work experiences. The editing process is limited in that they cannot add new employers themselves. Their rights are controlled via a new line on the ‘Student rights’ area under ‘Configuration’.
Appointments
1 You can now ‘block book’ appointments. To do this hold down the left mouse button over the first period and drag the mouse over the time slots until you reach the last one. Then enter the name of the student or alternative entry (via the pull-down menu) in the usual way and the entry will be made in all selected time slots.
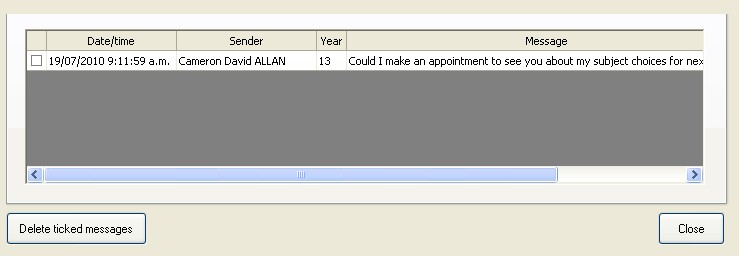
2 Students can now request appointments with any staff member.
A new button in the student module brings up the following screen via which students may a) select a staff member and b) send them a message.

When that staff member subsequently logs on to Future Indicative they will immediately be informed that there are one or more messages from students awaiting them. If they then elect to view them they will see the following window which lists all messages. Via this window they can tick (in the left hand column) those messages which they have finished with and then click on the button labeled ‘Delete ticked messages’ to do just that.
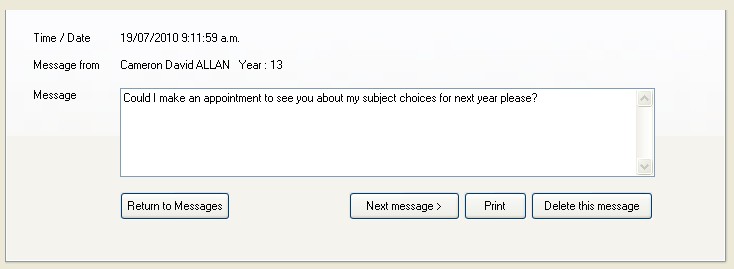
If they click on an individual message then the following screen is displayed which allows them to print or delete each individual message.
3 Each student’s class is now shown on the appointments screen
Web pages
1 A new button on this screen titled ‘All of our suggested sites’ allows users (including students) to see, on one screen, ALL of the sites which you have added for access by your students. This saves them from having to hunt through all of the possible categories.
2 Several further tertiary providers have been added to the list of website for universities and other providers. While you CAN add further providers yourself, if you would like to have other providers added for every school please let me know of their name and regions in which they operate.
Configuration
1 Global settings
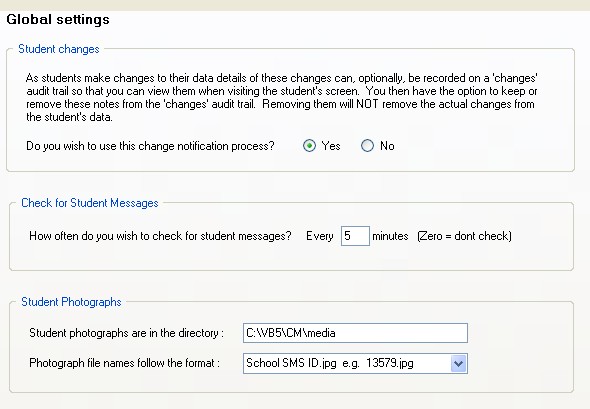
There are two new global settings.
The first setting – to allow you to record changes made to their data by students was added in a previous release. The two new settings are :
a Check for student messages
Use this setting to tell the program how often you wish to have the messages repository in the database checked for new incoming messages from students.
b Student photographs
If your student photographs are all in one directory and if they all follow a format base on the students’ sms numbers or their nsids then you can make those global connections here. Following this, each student’s photograph will be displayed on their ‘Basic Data’ screen.
Users
1 MUSAC schools can now add staff members from their MUSAC staff database – which will be visible on the right hand side of the Users screen. Set the rights for each staff member then click on them on the list. They will be added to the list of users.
2 A new staff right has been added which can now prevent unauthorised staff member from altering configuration details.
Printing Facilities
A lot of work has gone into this area.
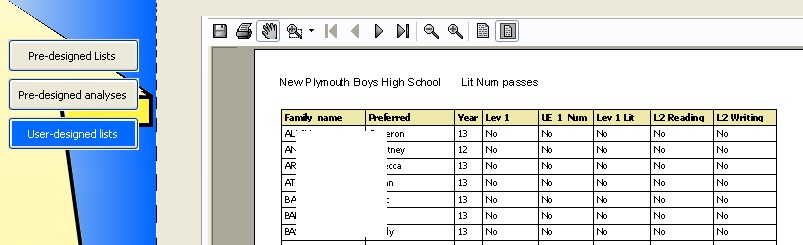
1 Pre-designed lists
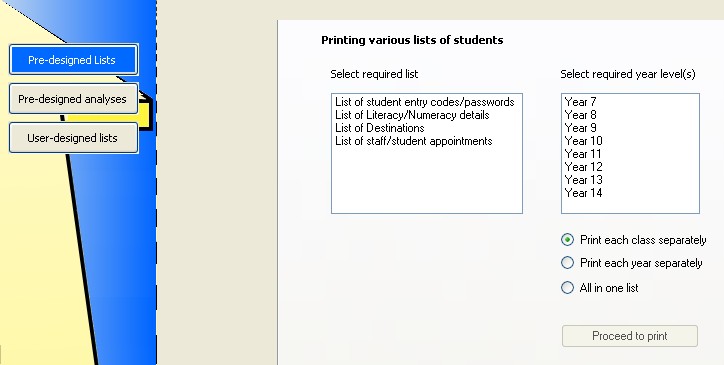
As can be seen above, there are four pre-designed lists for you to use. For each of the lists you can select particular year levels to include and you can print the resulting entries either by each class separately, by each year level separately or all in one list.
2 Pre-designed analyses
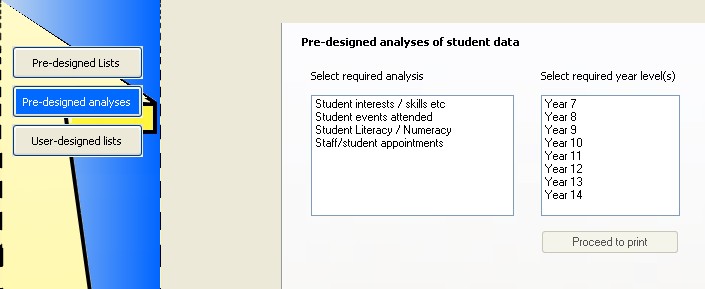
Similarly, there are four pre-designed analyses for which you can select which year levels you wish to have included. If you select more than one year level then the resulting display will present each year level separately and then a further combined totals table.
Have a look at each of these analyses which have been requested by various schools. As you select each one a subscreen will appear via which you are able to make choices concerning the analysis you have requested.
3 User-designed lists
The final printing facility allows you to design your own lists of students including selected items of information.
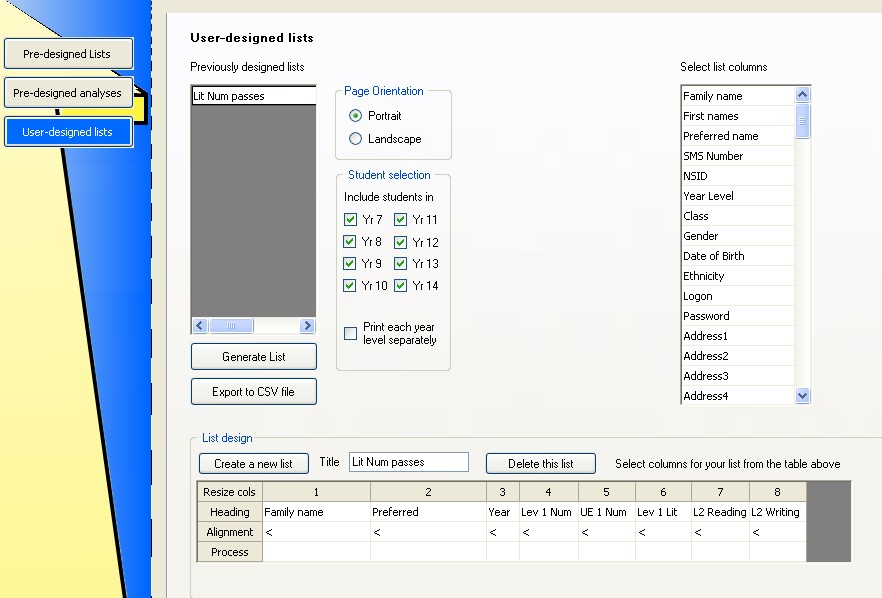
A sample list (of literacy and numeracy passes) has been included for you. The design of this list is shown above.
To design a list, click on the button labeled ‘Create a new list’ and give your new list a name. Then select the various fields which you wish to include from the table of possibilities on the top right hand area of the screen. As you select each one it will be added to the display at the bottom of the screen.
Check on the alignment of data in each column using the third row of the display and, via the fourth row, you can elect to have particular columns totalled. You can adjust the headings of each column by editing them and you can alter the width of each column by dragging the column dividers in the headings row to the left and right.
To print a list just select it from the list of lists, select the required orientation and the year groups to include and click ‘Generate list’. As with the previous two area of list printing, you will be transferred to the preview screen where you may view the list and, via the buttons at the top of the viewing area, either print the list (second button) or safe it as e.g. a pdf file (first button).
If you print more than one list during a session then you might find that, while the first list generates very quickly, subsequent lists take longer. Progress is shown via a progress bar in the bottom right hand corner of the screen. I’ve been unable to work out why subsequent lists take longer.
You do have an alternative to printing the list. You may, instead, export the data to a ‘csv’ file (csv = comma separated variables meaning that the individual pieces of exported data are separated by commas.) Excel likes csv files – so you have the opportunity to open your exported file in Excel.
Utilities
1 Global data entry
The format of this screen has changed a little to allow for further global entries. There is one new one which allows you to reallocate entry codes and/or passwords to all students. Select this option from the list and you will be able to select your required formats, as shown below.
You will also notice a small message in yellow on the global data entry screen indicating that, if you click on a student’s class in the right hand column of the display, all students in that class will be selected – meaning that you can now do global data entry by class.
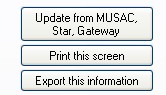
2 Global Updates
This screen allows you to update three areas of information.
a) From either MUSAC or Kamar : NZQA standards
All students (in selected years) will have their NZQA standards screen updated to reflect the latest information held in the SMS database
b) From Worsfold’s Star Management software
All Star courses taken by the student over the last few years will be imported and displayed on the student’s ‘Pathways’ screen.
All Gateway placements and courses taken by the student over the last few years will be imported and displayed on the student’s ‘Pathways’ screen.
Version 1.0.14 Released 10th June 2010
Over the past few weeks a number of minor faults (and a couple of major ones) have been identified and repaired in Future Indicative. We've also received a large number of requests for enhancements from the recent round of demonstration in Greymouth, Nelson and the North Island.
This release contains the following fault repairs and enhancements.
There are quite a few more to come as I still have 21 unprocessed requests from the seminars. I'll being work on these shortly and a further new release will be made in due course.
Faults
1. Student rights, as allocated via Configuration / Student rights, were not being recognised correctly in FIStudent and, as a result, students were able to do more than intended.
2. The routine for importing NZQA standards was somewhat faulty, resulting in the duplication of standards.
3. The student audit trail was not recording some entries correctly.
The following faults were corrected in version 1.0.13 - which has been available on the web for some times but was not issued as a major new release.
4. In updating students from MUSAC - leavers are no longer re-imported.
5. Two faults in calculating literacy and numeracy totals have been fixed. (A total blank result IS contained in the group 'AME' - and was being counted as a pass)
6. Multiple users with different passwords for the same entry code are now able to log in. It was working for students but not for staff.
7. A fault in the Year 8 Values section has been repaired.
8. A lack of word-wrapping in the session notes on the student screen has been fixed.
Enhancements
1. You can now have more than 30 staff members registered in the database.
2. The length of a student's logon can now be 30 characters
3. The students' cell phone numbers have been added to the search utility display.
4. A new 'Work Experience' button.
The previous table for recording 'other experiences' has been removed from the 'Pathways' screen and has been replaced by a screen of its own. Full details of work experiences can now be recorded on this screen and this also includes a 'full details of employers' screen. Employers are added via the '...' but next to the ’Employers’ pulldown list.
If you have linked to Worsfold Software's Gateway package then :
a) The list of employers and their details will be imported from the 2010 Gatway database.
b) There is a button at the bottom of the screen which allows you to import details of any Gateway Placements directly in to Future Indicative.
Students cannot yet view this screen via FIStudent.
5. A record of student changes
A new narrow column has been added to the front of the student selector panel. If a student makes changes to their data then a separate list of these changes is now recorded in the database. This will result in a 'yellow dot' being displayed in the left hand column. If you click on the dot you will be able to see what changes the student has made and you will be able to clear the list. Note that this does NOT remove the changes themselves.
To activate this process you have to visit a new second button under Configuration entitled 'Global settings'.
You can also allocate the right to delete students' lists of changes (when clicking the yellow dot) to individual users. This right has been turned ON by default. It can be turned ON or OFF for individual users via Configuration / Users.
6. When allocating passwords to students you now have a wider range of possible formats. This range now includes alphanumeric combinations.
7. A new 'Main button' has been added to encourage you to access the package manual.
8. A new list of 'Personal Qualities' has been added. This was provided by an Auckland school and will be seen when selecting 'Values' for students.
9. A message has been added to the splash screen to let you know that 'something is happening' after you sign on and before arriving at the main screen. What is happening is that any structural changes made to the database by the new version are being carried out. This may take a few seconds but future entries will be faster as the changes will have been made.
Version 1.0.13 Released 3rd May 2010
This is not an offical announced release. It contains a few minor bug fixes and has been requested by a few schools. The changes are :
1. A fault in allowing students to edit their passwords has been fixed.
2. In updating students from MUSAC - leavers are no longer re-imported.
3. Two faults in calculating literacy and numeracy totals have been fixed. (A total blank result IS contained in the group 'AME' - and was being counted as a pass)
4. Multiple users with diffrent passwords for the same entry code are now able to log in. It was working for students but not for staff.
5. A fault in the Year 8 Values section has been repaired.
6. You can now have more than 30 staff members registered in the database.
7. The length of a student's logon can now be 30 characters
8. A lack of word-wrapping in the session notes on the student screen has been fixed.
9. The students' cell phopne numbers have been added to the search utility display.
Version 1.0.12 Released 7th February 2010
1. A nasty fault in the transferring of students between the main database and an archive database has been repaired. This was resulting in the loss of a students' data.
2. An earlier fault which caused students' options to be the same for all years was fixed earlier. A routine to detect that fault and to automatically correct it has been added now.
3. A fault which prevented students from entering interests at year 9 was corrected earlier.
Version 1.0.11 Released 11th November 2009
1. A few minor annoyances have shown themselves - one in the area of importing Year 9 options and the other in generally importing students from Kamar or MUSAC. Both of these have been repaired. From time to time such problems will surface as new situations occur (e.g. one school had entered three telephone numbers in the space where one was expected and the data was too long to fit in Future Indicative). I have a couple of these which I'm still working on for individual schools.
2. I've received a few requests to be able to print lists of students with their entry codes and passwords. This has been added to the printing utility.
3. Networking
Yesterday an IT expert rang to say that he had successfully networked FI by installing it on to a file-server and then accessing it directly from work stations - without installing it on each workstation. Previously this had always resulted in a 'permission denied' error, as a result of which we'd had to use the 'distributed client' approach - installing the package separately on each work station.
While I don't pretend to understand the intricacies of networking in full I report here his comments in the hope that other might find them useful.
He created a separate folder on the server and installed to that folder. He ran in Microsoft's Service Pack 1 for the Dot Net Framework (It was this causing the blockage) and this involved three separate updates to Dot Net 2, 3, and 3.5.
He then says :
"To get around the hidden sms share, just make the links on a PC that does not have the share hidden & then the links work fine on all PCs/users with the share hidden also."
You might like to forward this information to your IT expert....
Another school had experienced some networking problems and these were solved by giving 'modify' rights to the \fi folder on the file server.
4. Auto-updating
Both Future Indicative and FIStudent have an autoupdating process built in. This means that when you run either fi.exe or fistudent.exe from a workstation, a check is made to see if there is a newer version available on the file server. If so then the program offers you the option to copy the newer version across. If you have sufficient rights then this will happen and, if not, it won't. To get around this you will have to manually copy the newer versions of fi.exe and/or fistudent.exe from the file server to each work station.
Version 1.0.10 Released 13th October 2009
This release has a significant number of enhancements and these are detailsed below.
The package itself
- An ‘auto-update’ feature has been added to the main FI program. I am aware that several schools are now distributing the main program around several workstation within the school. To date, when a new version arrives this must be installed on each and every one of the work stations. Once this new version has been distributed around the workstations then such a process will not be required in future. If the program is referring to a central directory on a file server (where the database is kept) then, each time you run the program, it will check to see if there is a newer version of itself available on the file server. If so then a message will request approval to bring the new version across to the work station in question and to run it – replacing the older version.
- Kamar has produced a new version of their export file which has a little more student information than the earlier version. It also has a record of each students’ nzqa standards so that, if you use the import button at the top of a student’s NZQA screen, then all of the standards and their results will be imported from the new file.
Students
- A year 14 screen has been added to cater for those schools who record students beyond year 13 as year 14 students. The only minor drawback has been the removal of Year 8 options from the ‘Subjects’ screen, which now runs from Year 9 through Year 14. In all other respects the Year 14 screen acts in the same way as the screens for other years.
- You can now email session notes to not just the student but to any ‘other’ email address.
- NZQA results. This screen has a button which was available to MUSAC schools and used to be labeled ‘Import from MUSAC’. Now it works for Kamar too, and has both Star and/or Gateway added in where you have indicated that your school is using either or both of Worsfold’s Star and gateway management programs. If so then any further standards found attached to placements and courses will be added to the display. There are two further buttons which may be used to print the details for the student displayed or to export them via a ‘csv’ file which may be then imported directly into a document such as a CV. (A ‘csv’ file is a ‘comma-separated variable’ file’.
While discussing this screen you will find that each standard’s domain has been added to the display, and you can sort the display by double-clicking in the column headings.
4.
Numeracy and Literacy. The NZQA display now has a ‘Literacy and numeracy’ display at the bottom of the screen. Each time the screen is loaded the standards displayed are checked to see whether or not the student has reached the required levels for the various Literacy and Numeracy achievement levels. The display is shown below.

5. You can now, via a new button on the student screen, have all of the data for that student sent to a text file in a format suitable for importing into a CV. This is, of course, also available via the Student module, FIStudent.
6. If you are adding text to a student’s ‘General Notes’ then, if you press Alt-D, the current date will be automatically added to the text.
7. Emailing. Quite a lot of time and effort has been spent trying to solve the problems associated with sending emails from within the package. The previous method turned out to have the problem that only a certain amount of information (address, subject, content etc) could be sent to the emailing process and that, if this was exceeded, then nothing happened. The whole process has been replaced by a popup ‘emailing’ window via which you can specify the address (or addresses), the message and any attachment. Consequently, when you now click one of the ‘Send’ buttons (for the student or either of the caregivers) then you will arrive at the following screen, via which you can specify the content and send the email.
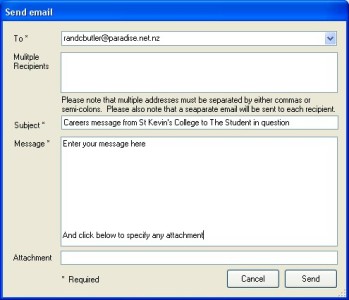 8.
8.
8. Back and Next buttons have been added to the bottom left of the student screen so that you may quickly move to the ‘Previous’ or ‘Next’ student without having to use the student selector.
Appointments
- An alarm system has been added to the appointments schedule. This means that every five minutes your scheduled appointments are checked to see if any are imminent. If so then an on-screen message warns you of this. You can set the level of ‘early warning’ via the Configuration area, as shown below.

N.B. To function correctly, your schedule times MUSY be in the format hh.mmam or hh.mmpm e.g. 10.15am or 4.00pm.
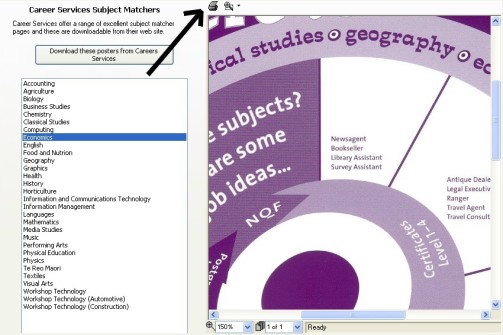
Web Sites
- The button labeled ‘Subject Areas’ leads you to a display of any of the excellent subject posters provided by Careers Services. These were previously visible but not particularly readable. They can now be enlarged to your requirements and can now also be printed. (An arrow points to the ‘Print’ button in the illustration below.
2. The Manukau Institute of technology has been added to the list of Tertiary Providers in Auckland and the Auckland University of technology has been moved to its rightful place as a University.
Configuration
- Students have rights within the student module – FIStudent. Previously all students had the same rights regardless of their year level. Now, each year level may be allocated its own set of rights. This is done by selecting the year level at the top of the Student Rights screen under Configuration.
Printing facilities
- Appointment Analysis
It is now possible to print an analysis of appointment for one or all advisors, between any two dates, analysed by year / gender / ethnicity.
Utilities
- There is a new utility labeled ‘Global Data Entry’ via which you may
a) Insert an event attendance
b) Add a new goal
c) Add to student notes
For all or selected students from selected year levels. The screen used to do this is shown below.
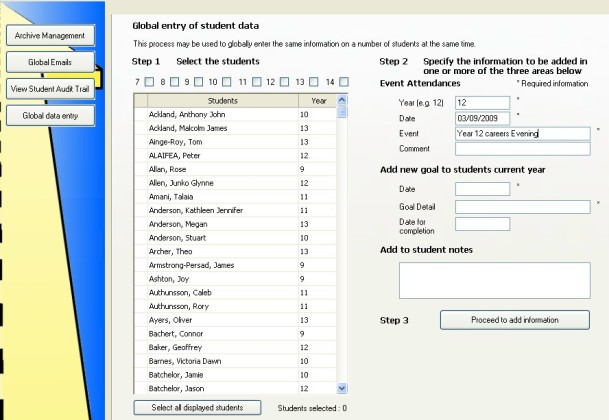
Note that, in the case of Event Attendances, if the event entered is NOT already added to the list of event possibilities then it will be added for you via this process.
2. View student audit trail. This utility allows you to track changes made by students using the FIStudent module. You can now
a) Double-click on a column heading of the display to sort that column (up or down)
b)
Print a list of selected audit trail entries (for use in confronting errant parties?).
3. Sending global emails
Students caregivers have now been included in this global process so that you can select addresses for students and/or their caregivers – for students from one or more selected levels – then send everyone an email. It would have been lovely to be able to send ONE email using the BCC process to hide all of the addresses. However, in spite of numerous requests for assistance to various programming forums around the world, I’ve been unable to make the BCC process work. All of the advice received says that the way I have done it is correct but it doesn’t work. Consequently I’ve reluctantly modified the process so that it sends a separate email to each and every address on the list which you provide. No entirely satisfactory, but it works.
Searches
1. A new button has been added to the bottom of the searches which allows you to email the results of the search to an email address of your own choosing.
2.
You can now include ‘Possible subjects’ and ‘Events attended’ in your search criteria.
Version 1.0.9 Released 10th September 2009
A minor adjustment for one school.
Version 1.0.8 Released 10th August 2009
A few minor adjustments have been requested by individual schools and these have now been incorporated into the package.
1. The display of options at each level was limited to ten - this has now been opened up to the number of options imported from MUSAC.
2. The appoinments schedule - daily display - has been narrowed a little to ensure that the vertical slide to access later times each day is now visible.
3. You can now delete a student - using the button labelled 'Delete this student' at the bottom left hand corner of the student screen.
4. You can now delete an appointment by right-clicking on it.
Version 1.0.7 Released 29th June 2009
A minor repair for one school - to do with the number of options at each level. (See notes on version 1.0.8 above).
Version 1.0.6 Released 29th June 2009
A couple of faults have surfaced which have now been repaired.
1. The ipmport from MUSAC process turned out to be importing each student's class instead of their Postal Code. This didn't cause a problem until one school had a class which was 5 characters in length, causing a crash.
2. The display at the bottom of the NZQA standards (imported from MUSAC) was wrong. It was counting credits for standards which had not yet been achieved).
3. The freezing of the program during the import process has been fixed. It should now behave nicely during the import process.
Version 1.0.5 Released 9th April 2009
With any luck we are now at the end of the expected flurry of releases following the initial release. A couple further minor problems have made themselves apparent and they have been fixed. A couple of enhancements should make life easier for users of MUSAC in updating student data.
Bug fixes :
1. I had overlooked the fact that student logons in MUSAC might be more than 10 characters - the limit which I had placed on the student logon in Future Indicative. This was causing a further 'Too much data' error. Imported logons are now chopped to 10 characters.
2. A second fault related to importing logons presented itself as 'double field definition'. This too has been fixed.
3. In spite of my claims that I had fixed the entry of subject codes, I had not doen so. I have now.
Enhancements
1. MUSAC users now have the choice, when they 'Update from MUSAC' of a) just bringing in new students or b) Updating original student AND bringing in new ones.
2. A new button on the student screen for MUSAC users allows them to reimport MUSAC data for any particular student directly.
Version 1.0.4 Released 30th March 2009
This is the first update to this new package and it contains two major changes.
The enhancements are :
- A section for ‘Career related Health details’ has been added to the ‘Sensitive Notes’ screen. However, unlike the sensitive notes, the entries are visible by all users.
- If there are alarms for the Appointments screen then you can jump directly to any of the student affected by double-clicking on their name on the alarms screen.
- Appointments can now be made for other than students. Previously, when you clicked on an appointment area, the cursor moved down to the student name area to await your entry of the first part of a student’s name, before displaying a list of matching student from which you selected the student concerned. The program still does the same, but now there is a popup menu behind the text field (Its arrow sticks out to the right) via which you can select from your own non-student entries. You can add further entries of your own in the usual way by clicking on the ‘dots’ button beside the popup.
- If you are using MUSAC and you DON’T tick the box to have new entry codes and passwords automatically added to students as you ‘Update from MUSAC’ then the program will import the entry code and password which has been allocated to them inside MUSAC. (There is a process to do that in CMAdmin).
- The search process has been extended to include ‘Events attended’ and ‘General notes’.
Some of the faults found and squashed are :
- It was difficult to edit the appointment times via Configuration.
- Some schools experienced crashes during the import of students from MUSAC. This is because incoming data details were sometimes longer than anticipated. These fields have been lengthened.
- Editing subject codes caused existing subjects without codes to be lost.
FIStudent and Networking.
We have still not been able to find an easier way of networking the program. However, this update includes a further small program (FISUpdate.exe) which should be in each \fi directory on terminals running the software. Each time FIStudent is run in future, it will check on the fileserver to see if a more up-to-date version of itself is sitting there. If it finds one then a prompt will appear, offering to automatically bring the new version across to the terminal. If you respond ‘Yes’ then the program will automatically shut itself down and run the little update program which will remove the existing FIStudent.exe and copy over the new one from the fileserver.
This means that, should a newer version of FIStudent be release (as is bound to happen) then you will NOT have to take it around each terminal. Unfortunately, this won’t come into effect until the NEXT time FIStudent is updated.
Version 1.0.3 Released 4th March 2009
This is the first update to this new package and it contains two major changes.
The first relates to networking. Please read the section below, even if you are NOT networking the package, as there are instruction therein which will apply to you the first time you run the new version.
The second relates to the release of FIStudent – the student access module, via which students can access / edit their own data – depending on security settings you’ve made in the Configuration area of main package.
The update is a file called FIUpdate.msi and this can be copied to your desktop and then run (by double-clicking on it) to install the latest version. I’ve been working on an automated process for this but that part of the process is not ready yet.
For those networking the program you can, if you so wish, download the full installation version of the new release use this to install on each terminal – rather than following the instructions below. (N.B. That download is 14meg)
1. Networking Future Indicative.
Four schools have reported difficulty in networking Future Indicative. It turns out to be a result of increased security by Microsoft, now insisting that every terminal be granted individual approval to trust each component of each software package accessed across a network (if it is written in their latest environment – VB2008) They even have a special tool to grant access. It’s called Capol.exe – which stands for ’Code Access Security Policy Tool’. Unfortunately, it doesn’t work properly with their latest version of the .net framework – and there are MANY web links relating to it including an ‘apologetic blog’ from a Microsoft person.
As a result, I had to find a way around the problem and the solution is called a ‘Distributed Client’. Basically this means that you install the program in full on every terminal (including the file server) and have each terminal ‘point to’ the server, where the database resides. I’ve modified the program so that it now works in this manner.
For those already running the package :
- Use the original CD to install the package on each terminal (workstation).
- Download the latest update and put the file (FIUpdate.msi) in the server’s \fi directory.
- Run FIUpdate.msi on the server (to install the latest there) and then run it via each terminal to have each terminal updated to the same version (of fi.exe and FIStudent.exe)
- Then run the main program (fi.exe) in each location and you will be greeted with the screen:
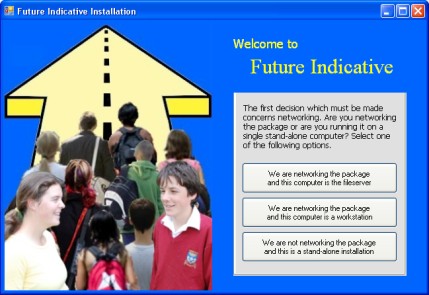
This asks you to select which of the three listed scenarios applies to the computer in question.
If you are on the file server, select the first.
If you are on a terminal then select the second, and you will be asked to browse to identify the fi directory on the file server.
If you computer is a stand-alone machine then select the third option (which is really the same as the first).
2. FIStudent
The Student module is included as a part of this release. This is a separate program (FIStudent.exe) which also resides in the \fi directory. It is intended for use by students who will each require a logon and a password to be able to sign on to the program.
What each student can see and do in the student module depends on the student access configuration settings which you have made in the Configuration area of the main program.
A new feature has been added to the routine which imports students from either MUSAC or Kamar. Now you can have each student automatically allocate an entry code (logon) and a password (in the form of a 4, 5 or 6-digit pin number) as they are imported (or updated). You can select how many digits are in the pin number via the new choice on the ‘Package links’ screen under Configuration.
Version 1.0.2 Released 12th February 2009
This corrects a fault which was stopping MUSAC users from linking to the MUSAC database
Version 1.0.1 Released 2nd February 2009
This is the first release of Future Indicative. There are still a few basic features to add, e.g. the Student Module, and thse will be released as updates very shortly.
the new year.
The package will be student-based of course and will maintain careers information of all student from year 7 through to year 13.
The basic student details will be able to be extracted from MUSAC or from Kamar in the same way that their information is imported into both Star and gateway.
Their subjects (and associated data) will be recorded for each year at school.
For each year you will be able to record :
- Their interests
- Strengths
- Skills
- Proposed Goals
- Achievement record
- Interview information
- Ongoing Monitoring
- For the older students you will also be able to record
Electronic programs used
- Careers exploration questionnaire information
- Interview information
- CV information
- Star courses taken
- Gateway Programmes taken
- Future year choices.
The program will be able to generate student-based documents of full and summary information
It will feature a global search utility so that you can easily identify e.g. all those who are interested in Policing or Nursing etc.
The package will feature a full Appointment Schedule so that you can keep track and keep a record of student appointments. This will include an optional alarm system to alert you to upcoming appointments.
There will be links to relevant websites.
There will be a student module via which they can access relevant portions of their own data and, with validated access, modify their own information.
There will also be space for caregivers' and guidance and career peoples' comments.
The cost of the package will be $395.00 + GST and there will be an annual license fee of $160 + GST - which will cover the cost of support and on-going development.
Is their some aspect of the package I've missed? Let me know : Click here to email me
Copyright 2008 (C) Worsfold Software Ltd