


Gateway course management software
Notes concerning the latest changes
Version 2.1.39 Released 24th July 2017  the new version
Latest changes to Worsfold Software’s GATEWAY Course Management software
Version 2.1.39 Released 24th July 2017
1. You can now change the date on students' placement notes.
2. Some minor changes have been made to the backup routine under Utilities.
3. Selecting standards from latest version was faulty. ALL latest versions are now listed.
4. Employer/Provider details were not coming through to Individual Students documents. They are now.
5. When printing 'Students out between', details of course providers were not being included. They are now.
Version 2.1.38 Released 2nd July 2017
1. The start date and end date of a student's course can now be removed by deleting them.
Version 2.1.35 Released 1st May 2017
1. The button to Remove a Logo from a document now works.
2. There is a new button under Document Design which enables you to duplicate an existing document. (This is useful as any logo and its position is duplicated too).
3. A recent version caused the list of documents to display zeros after a document was selected. It's all better now.
4. There is a new checkbox beside the Course Cost so that you can tick if it has been paid. (This has been included as a new code in the document design for courses)
5. The Gender by Ethnicity Analysis now picks up students taking courses for which there are no standard attached.
Version 2.1.33 Released 5th April 2017
1. Somehow the year 2015 had been hardwired into the routine which prepares the students' placements for export to the TEC spreadsheet. As a result, ALL placements were being rejected as starting AFTER 04/07/2015!!! It is now looking at the year at the top of the main screen.
Version 2.1.32 Released 3rd April 20171. The placement employer was displaying the employer's physical address rather then their postal address.
2. A couple of schools have experienced problems getting their document logos to position correctly. As a result I've changed the way logos are positioned. You now use four buttons to specify exactly where the logo shosuld be : left, right, up and down rather than left, centre or right.
Version 2.1.31 Released 22nd March 2017
1. A fault in the financial summary (under Configuration) has been fixed. A total was being doubled if you made changes to overhead costs and then viewed the summary. It was always correct if you went straight to it but not is=f you made some changes to overheads first.
2. The selected row on the tables of students' standards are now highlighted to make it easier for you to enter results.
3. When adding standards you are now asked if you wish to have the previous provider (if any) filled down to the new standards..
Version 2.1.29 Released 2nd March 20171. Printing of multiple documents now works. Previously you could not select more than one.
2. The Students Placement Agreement (TEC) had several errors on it, e.g. ALL students were males!
3. Updating data from The Edge now picks up just the first ethnicity. The Edge had started exporting multiple ethnicities.
4. Margins for the TEC documents have been now hardwired to zero. Some schools were reporting large left margins.
Version 2.1.26 Released 24 January 2017
1. The hyphens in the TEC Oucomes (eg have been changed to the longer versions used by the TEC so thatthe spreadsheet no longer rejects them - even though they look almost exactly the same.
2. The Gateway Agreement (TEC) document has been reworked to improve it.
3. Several fields have ben added to User-Defined Lists - under Placements.
Version 2.1.25 Released 9 December 2016
1. The process of copying a placement from one student to another has been fixed.
(The credits were not coming across)
2. The entry for students' standards and credits, taken and gained, in User-defined lists was not working correctly.
3. Pre-designed lists No 3 was recognising standards as duplicates incorrectly.
Version 2.1.24 Released 6 December 2016
A small fault in a predesigned list (no credits showing) has been fixed
Version 2.1.23 Released 5 December 2016
1. Ethnicities have been reworked to incorporate the TEC set rather than the MOE set. Users of
Kamar can now elect to import/update using the FIRST OR the SECOND ethnicity. In some
schools the first ethnicity is the simple generic one and the second is the more specific. You
can make the choice on the Configuration / SMS screen... then Update from Kamar in Utilities.
2. The TEC Standards return was not picking up standards which belonged to courses which were
NOT attached to a placement. The program now warns you of this possibility and provides
the option of automatically attaching them to the first placement for the student concerned.
Standards attached to these courses will then be included in the analysis.
3. The Yes/No toggle on student course costs now works.
4. The pull-down menus for cost categories on placements and courses now have 'type-ahead',
as have the combo-boxes (e.g. ethnicity, Iwi etc) throughout the package. Just type the first
letter of, eg, the required ethnicity.
5. I've modified the process of selecting a photograph slightly to make it easier and modified
the automatic attachment process which you can specify in 'Default Settings'
6. 'Vehical' is now spelt 'Vehicle' in six places! Ouch!
7. On the User-defined Lists screen the field selector would not scroll to the bottom. It does now.
Version 2.1.22 Released 26 November 2016
1. Ethnicities have been reworked to incorporate the TEC set rather than the MOE set. Users of
Kamar can now elect to import/update using the FIRST OR the SECOND ethnicity. In some
schools the first ethnicity is the simple generic one and the second is the more specific. You
can make the choice on the Configuration / SMS screen... then Update from Kamar in Utilities.
2. The Yes/No toggle on student course costs now works.
3. The pull-down menus for cost categories on placements and courses now have 'type-ahead'
as have the combo-boxes (e.g. ethnicity, Iwi etc) throughout the package. Just type the first
letter oif the requird ethnicity.
4. I've modified the process of selecting a photograph slightly to make it easier.
5. 'Vehical' is now spelt 'Vehicle' in six places! Ouch!
Version 2.1.20 Released 23 November 2016
A couple of nasty bugs were introduced when I released the big lot of changes in v18.
1. Changing to a different year (and making that the default year) caused the program
to open an 'empty' year - and not recognise your logon.
2. Employer categories longer than thirty characters were causing a problem.
Version 2.1.19 Released 22 November 2016
I broke one of the Pre-designed lists - the third one down. Darn... It's fixed now.
Version 2.1.18 Released 20 November 2016
The main changes in this release are :1. For Other Assessments 'Y = Passed' has been changed to 'P = Passed'. This is to avoid confusion with 'Y = Failed to sit' for standards.
2. Students may now take the same standard more than once across different placements/courses. The result, however, will only every be counted ONCE in analyses and exports.
If you attempt to add a course to a student, the adding of which would result in duplicate standards, then you will be warned that this will happen if you proceed.
Where students DO take the same standard twice then the various reports will have these highlighted. The number of credits taken will only count the credits for that standard ONCE and, if both are achieved, then the credits gained will only count them ONCE.
3. Via Pre-designed lists, you may now print Employer lists BY CATEGORY. A new checkbox allows you to select this option.
Several small but unpleasant faults have been fixed...
1. ALL course standards are now included in both the Voc. Pathways display and the TEC Results export.
2. Other costs under Overheads are now loading correctly and you can remove unwanted costs correctly.
3. A couple of long Placement Areas were causing a crash.
4. If a placement standard had a provider specified then, when other standards were added a crash occurred.
5. The assessor of a course standard was not coming in when the course was added to a student.
Version 2.1.15 Released 01 November 2016
A crash was occuring when adding placement standards where a previously added standard had a provider specified.Version 2.1.15 Released 01 November 2016
A few minor changes since version 12 :1. The Old TEC report was not listing income details.
2. One school reported missing credits on placement standards. An automatic routine now makes sure that these are not missing.
3. A fault in displaying a student's courses, under one particular situation, has been fixed. This was causing blank standards to be attached to students. An automatic routine now makes sure that these are removed if found.
4. Minor changes to user-document entries
Version 2.1.12 Released 01 November 2016
1. A third new document component has been added to student fields. You can now include a list of placements and courses and the same list including standards, either just those achieved or all standards.
Version 2.1.11 Released 31 October 2016
1. The process of changing a date on the costs entry screen has been corrected.
Version 2.1.10 Released 30 October 2016
1. Two new document components have been added to student fields. You can now include on
documents
a) A combined list of all placements and courses taken by the student
b) The same list showing standards taken.
If you include Placement or Course specific fields in a document (selected from the Placement or
Courses lists, then separate documents will be generated for each placement or course. These now fields
allow you to have ALL listed when they are selected for documents from the Student list of fields.
Version 2.1.9 Released 28 October 2016
1. You can now alter dates on placement and course costs. Costs re now saving correctly. Previously, it depended where you clicked after entering a cost as to whether or not it save correctly.2. On User-Defined lists, the employers' physical and postal addresses were switched.
Version 2.1.8 Released 26 October 2016
1. The layout of the Placements screen has been modified to allow for more room for standards when using a higher screen resolution.
Version 2.1.7 Released 25 October 2016
1. A fault when clicking Yes or No for Paid or Completed on standards has been fixed.
Version 2.1.6 Released 25 October 2016
1. At the request of several schools, a popup screen has been added to allow you to specify the margins
for documents. Once you are happy that your margins are set correctly for this document, you can tick
the box on the screen to have the printing process skip this request in future. There are twenty different
printingroutines in the program and each will be able to have its own settings. You can undo the request
to remember your settings via Configuration / Default Settings
2. The Costs Summary report was not reporting 'Yes' when student placement costs had been paid.
3. The Placement Agreement (New) has been modified slightly to improve its appearance and a new
version of the logo for that document has been distributed.
4. A fault was occurring when you add standards to a placement by typing in the number and version.
Version 2.1.5 Released 19 October 2016
1. The utility to cross check credits on standards has been added to Utilities / Compact. It's at the bottom of the screen.
2. Following a request from one school, the Courses screen has been reworked to provide more space for courses and standards.
Version 2.1.4 Released 17 October 2016
1. The Progress Report is now retporting correctly. (Fuller details of results can be obtained via Printing/Pre-designed lists/Gender and Ethnicity Analysis.
2. After selecting standards, your selection is now retained fr other placements, unless you click the new 'Clear selection' button.
3. The process of attaching standards to placements (and courses) has been attaching the wrong credits. This has been fixed, and a on-time-only test as you enter the program will check and insert the correct credits.
Version 2.1.3 Released 13 October 2016
An unpleasant fault was discovered which caused problems with document printing. This has been fixed.
The autobackup system, which makes a copy of your database, each type you exit from the program, ha caused the database to become corrupted in two schools. Fortunately BOTH schools had independent backups of their databases. Hopefully, that nightmare has been removed for good, as has the autobackyup routine which was causing it. Many thanks to those who helped me to find that one.
The max/min and exit buttons have been restored to the top right-hand corner of the main screen so that you can minimize the program if you so wish.
Version 2.1.2 Released 11 October 2016
The inevitable has occurred. A couple of small faults have appeared in the new version of Gateway. Most will not experience them unless a) you have a apostrophe in a Placement title or you are running across a networked server.
Version 2.1.1 Released 10 October 2016
Please note that this update will NOT install a working copy of the new version. To obtain the new version please contact Worsfold Software Ltd. The cost of the update is $99 + GST
= = = = = = = = = = = = = = = = = = = = = = = = = = = = = = = = = = = = = = = = = = = = = = = = = = = = = = = = = = = = = = = = = =
Version 1.11.12 Released 6 July 2016 the new version
Latest changes to Worsfold Software’s GATEWAY Course Management software
Version 1.11.12 Released 6th July 2016
Well, darn! The TEC export routine had been handling the Industry Types perfectly well but, somewhere along the way, I made a small change which stopped them working. (Two of them were being truncated somewhat). Very Celever! It's fixed now. Some student with ethnicity 'European' were not being treated correctly either but they are now.
Version 1.11.10 Released 31st May 2016
The routine to copy student data to the TEC spreadsheet has been modified to work in 2016. (Very useful change!)
Version 1.11.9 Released 14th February 2016A change has been made to allow for schools who have switched to MUSAC's eb-based SMS, The Edge. Configuration now allows you to indicate that you are using The Edge.
Also, the routin to export stardards results to the TEC Results Spreadhseet was not displaying standards attached to courses on the SCREEN. It WAS, however, including them in the spreadsheet itself.
Version 1.11.8 Released 31st January 2016
A small change has been made to the Vocational Pathways display routine for those using Kamar. This is because the routine extracts students' standards results from the Kamar export, worsfold.csv. Since this export only contains the CURRENT years' results, if you export a fresh file for 2016 then none of the 2015 results are in that file and the Pathways display shows a distinct lack of results! The program now checks for standards attached to the selected placement and any attached courses. Much more betterer!
Version 1.11.7 Released 14th December 2015
This version contains the new export of data to the second TEC Report spreadsheet - that via which students' results are submitted. It functions in exactly the same way that the first TEC export works - by transferring the data to the computer clipboard from where it may be pasted into the Report spreadsheet.
A video demonstrating the first process may be found on YouTube at : http://youtu.be/cH2wFoerT0c
Please note that only those standards which have been achieved (or better) and are attached to placements will be exported to the spreadsheet. This will include any standards attached to COURSES which are, in turn, attached to placements. To attach a course to a placement, go to the student's Courses screen, select the course, and, via a pulldown near the top of the screen, select the student's placement to which the course is attached. Any achieved standards in that course will subsequently be included in the data collection for the TEC spreadsheet.
Version 1.11.5 Released 30th November 2015
A change has been made to the Vocational Pathways display to EXCLUDE Level 1 standards from contributing to Vocational Pathways. Even though they are listed in the TEC spreadsheet of contributing standards, they are NOT counted when evaluating a student's performance in the Vocational Pathways at Level 2.
Version 1.11.4 Released 24th November 2015
A fault in the students' Vocational Pathways display, where some standards may have been included twice, has been repaired.
Version 1.11.3 Released 9th November 2015
A fault in a full cost analysis report has been repaired.
Version 1.11.2 Released 4th November 2015A number of minor issues to do with the TEC Report 'Cut and Paste' process have been identified and fixed.
Version 1.11.1 Released 29th October 2015This release contains three new fields of placement detail required for the 2015 End-of-year TEC Report Spreadsheet. These are :
Outcome - Employment
Outcome - Education
Teen Parent Funding
These are to be found on a new tab on the student's placement screen (at the right hand end of the row of tabs begining 'Costs')
These items are also now included in the export process used to prepare your data for copying and pasting to the TE Report Spreadsheet.
A few minor other adjustments have also been made, including a couple of spelling corrections. Please let me know asap if you find an further such annoyances.
Version 1.10.12 Released 28th August 2015
A fault was causing the program to crash when saving details of a newly created course.
Version 1.10.11 Released 18th July 2015
A couple of minor adjustments have been made to the TEC spreadsheet routine. Genders are now returned as M, F or O, and 'Service industries' is now corrected to 'Service Industries'
Version 1.10.10 Released 18th May 2015
A number of refinements have been made to the process of auto-completing the TEC Report spreadsheet. You now receive a full report on the submission process and placements beginning in the second half of the year are omtted, along with those students and placements which have faulty information.
Iwi has been added to the student screen so that Maori students may now have their iwi recorded, and this, too, will now go through to the TEC spreadsheet.
Version 1.10.8 Released 20th April 2015
Following discussion with my guru on all things Gateway, we've decided to shange the 'Area of Study' for each placement to one of those from the list now required by the TEC. This will happen automatically when you first run this new update and, where possible, your existing 'Areas of Study' will be replaced by the matching one from the TEC list. It has not been possible to match ALL areas so you will need to visit each placement to ensure that the area of study is specified.
Version 1.10.6 Released 1st April 2015
Following any major upgrade there are bound to be a minor fault or two found and this one was no exception. Hopefully they've all now been found and squashed.
1. The student printing routine was taking you to the new 'Missing standards' screen and not to the print preview screen.
2. Standards imported via the 'Missing standards' screen we showing on the Vocational Pathways list but their results were not being recognised. They are now.
3. The global process to import students' standards from Kamar for a previous year was not displaying the file selection dialogue. We'll, it was, but it was off the screen to the left!!! I've never struck this before but I've been able to solve it.
4. The student's standards displayed on the Vocational Pathways screen are now in numeric order. I don't know why I didn't do this earlier.
There may still be a discrepancy between the standards that this program is showing for Vocational Pathways and what Kamar is showing. I haven't found a cause for this yet but I'll keep working on it. This program is sometimes showing MORE standards than Kamar is, but these have been imported from Kamar. Work that one out!
Version 1.10.3 Released 23rd March 2015
The following notes refer to the latest changes. Can I respectfully and earnestly suggest that you take a minute or two to read them as it may well save phone calls and emails in the following weeks!
- A print button which had disappeared from a recent update has been replaced.
- The same recent update disabled the ‘three-dots’ button on the course definition screen where you clicked to adjust the file of employers. This button now works again.
- A new field (which was added some time ago and then removed) has been restored to each placement – whereby you can select the Vocational Pathway which best applies to each placement… or select ‘No Vocational Pathway’. This information is used in the following new process.

- As promised, I’ve added a ‘cut and paste’ process to automatically fill in the new Report that the TEC requires.
It’s under Utilities’ where you’ll see a new button labelled ‘TEC Spreadsheet’. This reveals the following screen.

The idea is that the routine prepares all of the data for the spreadsheet and places it in the computer’s Clipboard’. All you then have to do is to open the TEC spreadsheet, make sure you are in the right place and Paste … and, lo and behold, the spreadsheet will be populated with the necessary student data. There will be some gaps which you’ll have to fill in manually but this process should get you almost all the way there.
The first step is to select your default TLA from the pull-down options at the top of the screen.
Then click on the large button labelled ‘Prepare the student’s details’. All students will be scanned and their placements and relevant details recorded on a file.
At the end of the process the information will be in the computer’s clipboard and you need to follow the four steps illustrated on the screen above to have the information added to the TEC spreadsheet. You will also have the chance to PRINT a list of the students and their placements, via an option which will appear :

I suggest the you select ‘Yes’ as this list will provide information that you will need to complete the spreadsheet and will attach a list of instructions on how to do that completion process.
The green button, labelled ‘Hint’, informs you that you can repeat this process as often as you wish to test the process. I suggest that you open an empty spreadsheet in Excel to test it, rather than paste into the TEC Report spreadsheet – as you do not wish to risk saving this data in the spreadsheet until you are actually ready to send it in to the TEC.
5. The other changes all relate to Vocational Pathways.
a) A small change has been made to the wording on the ‘Explanation Page’ to make it clear that the Sector Related standards for each pathway are included within the Recognised Standards for that pathway. The original did not make this clear.
b) The major change is to the NCEA Level 2 progress bar at the top of the display. This had earlier suggested that a pass could be obtained in Level 2 simply by earning 60 or more level 2 credits. This has been modified to include the extra 20 credits that must be earned at level 1 or above. The Explanation Page has also been suitably modified to explain this.
c) If your school is using MUSAC’s Classroom Manager then all of each student’s standards will be displayed, along with her or her results. If, however, you are using Kamar then it’s not quite so straight forward. The current Kamar export file (worsfold.csv) only contains information for the CURRENT year’s standards and omits information relating to those from previous years. Consequently many of each student’s standards may well be missing.
To cope with this, a new button has been added just above the student’s list of standards on the Vocational Pathways screen. The button is labelled ‘Some missing?’. Clicking this button takes you to a new tab one the student’s screen labelled ‘Missing standards’.

This screen allows you to add in. for the student, any standards which he or she may have taken in previous years and which may contribute to the Vocational Pathways display. You have two options :
a) You can add the standards manually to the table shown on the left of the screen.
b) You can IMPORT standards from a previous year’s worsfold.csv IF you have access to such a file. If you can find a previous year’s worsfold.csv then rename it to e.g. worsfold2014.csv and put it into your \gw directory. Then you can import from it by clicking on the suitably labelled button at the top of the right hand side of the screen. This will allow you to identify the previous year’s file and ay standards found for the student in question will be imported and will thereafter be available for the Vocational Pathways analysis/display.
The level and credits for each standard are extracted from the database of standards. If found the data will be added to the grid for you. If NOT found then you will have to fill in this information manually.
In either case, remember to click on the ‘Save these’ button at the bottom of the screen.
A third global routine has been added to Utilities / Update data from Kamar. This allows you to identify a previous year’s Kamar export and it will bring in previous year’s standards for ALL recognised students – so that you don’t have to do them one at a time.
Version 1.10.2 Released 11th February 2015
A few changes as a result of feedback about version 1.10.1
1. I've added a new field on each student's screen so that you can identify each student as a Vocational Pathway student (or not). The new field is towards the bottom of the left hand column of student data. As a result of having this field and subsequently identifying your Vocational Pathway students you can, when you go to Print Lists to print the new Vocational Pathways charts, select just the VP students.
2. I believe that I've left the tabs on the student screen out of their correct order, so that, for example, if you click on Courses you get Costs.... darn. Sorry about that.
3. On the explanation page for the new chart I said that, to qualify for a pathway, each student must achieve 60 credits from the recognised standards AND ALSO achieve 20 from the sector related standards. This has been changed to read 60 from the recognised standards AND THIS MUST INCLUDE 20 from the sector related ones. I was easy to misunderstand what I'd written.
Version 1.10.1 Released 6th February 2015
Changes to Gateway for Version 1.10.1
Following the Cate Conference in Tauranga late last year, a number of changes have been made to Gateway to provide information relating to Vocational Pathways.
1.
Both the Placements screen and the Courses screen now have a row of indicators across the bottom of the screen to indicate to which vocational pathways each placement or course contributes. e.g. the placement in the illustration below contributes towards five different pathways.
![]()
2. A new tab has been added to the ‘Student’ screen to provide access to the new Vocational Pathways chart.

This chart is based on that designed by the MOE/TEC. It has been modified to include ‘what the student is taking’ so that they can see not only what they have already achieved but also what they will attain if they achieve all of the standards they are taking.
I believe that this offers a more compelling incentive to students as they can see more clearly where they are currently heading.
An example of the screen display is shown below.
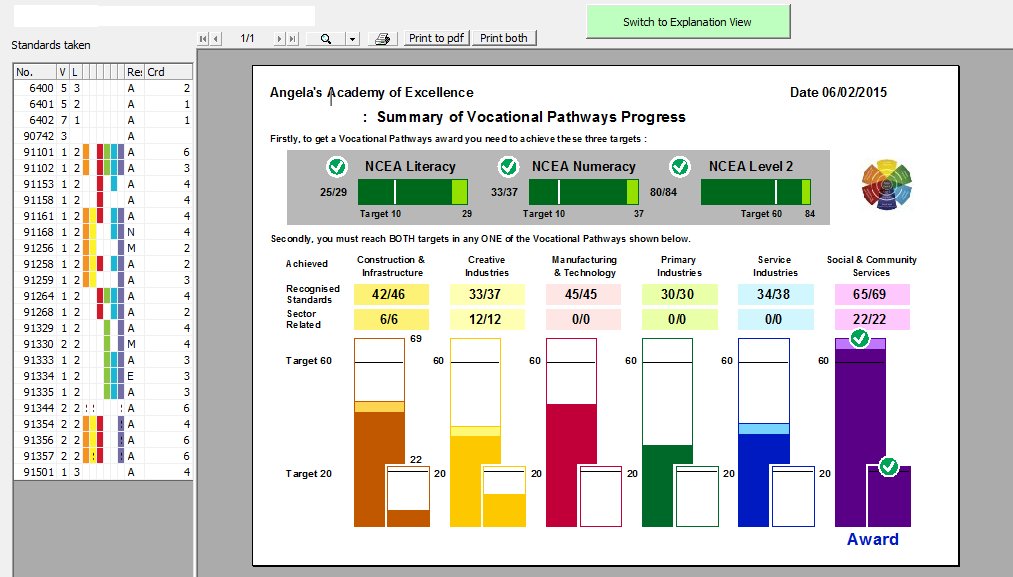
On the left is a table listing the student’s standards showing to which vocational pathways each contributes. On the right is the new chart.
At the top of the chart are the three NCEA targets : Literacy, Numeracy and Level 2 and below that are the six vocational pathways each displaying the students taken standards and achievement for both Recognised Standards and Sector RLATED Standards.
This chart is sufficiently complex that it requires further explanation and, at the top of the screen, a pale green button provides access to the Explanation Screen, an example of which is shown below.
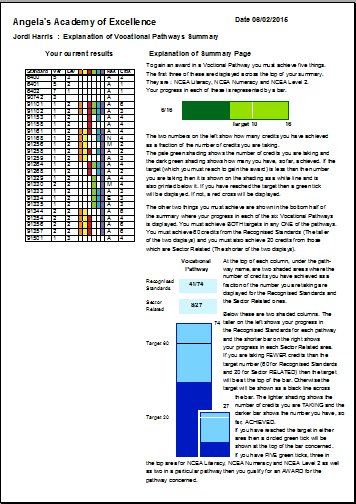
The student’s standards table is reproduced on the left of this page and, on the right hand side, each aspect of the previous screen in explained in detail. . (It is too small to be read here, but you can view one on a student’s screen.)
Buttons on the viewing screen allow you to print the two pages, including printing them to a pdf file.
3. The ability to print these for ALL students (not just Gateway students) has been added to the Printing Utility. A new button at the bottom of the left hand column of buttons allows you to select those students for whom you wish to print and to then print. These printouts will ONLY go to the PRINTER. They cannot e previewed via this process. You can choose whether or not you wish to include the explanation page for each student.
4.
Student’s list of standards taken for placements and courses are now displayed in numerical order.
5. A new list has been added to Predesigned Lists. You can now select the last option on that screen to print Course Lists – i.e. a list of students taking each of your courses.
Please note that, to produce the Vocational Pathways reports, the program requires the information contained in two small files : vps.txt and litnum.txt. These files are included in the download and should be extracted, along with the new update of the program (gw.exe) and the latest standards file (standards.txt), into your \gw directory.
Version 1.9.2 Released 12th September 2014
If you change the code of a standard provider then the coderecorded against all students' standards with this provider will automatically be updated to the new code.
Version 1.9.1 Released 2nd September 2014
1. There is a new main button in the top row labelled 'Instant Progress Report'. This leads you to a screen which provides an instant summary of the numbers of students and the numbers and averages of standards taken and passed and credits taken and passed at the current date. This will be useful for monitoring the average number of credits gained by students during the year.
Version 1.8.20 Released 27th May 2014
1. Three fields (Date withdrawn, Date reported and Outcome) have been added to user-defined lists involving placements.
2. You can now select 'All years' for printing user-defined lists. The program will attempt to extract information from up to six years previous databases.
Version 1.8.18 Released 3rd December 2013
Following the Cate Conference in Queenstown, a new analysis of Vocational Pathways has been added to Pre-designed lists. (Bottom of the left hand column) There are two possibilities - straight numbers or percentages of students on the Gateway database.
The Vocational Pathway has also been added to the individual student printouts.
Version 1.8.16 Released 18th September 2013
One school requested that a new pulldown menu be added to the Placements screen to allow you to indicate to which Vocational Pathways Sector each placement belongs. This information can now be added to each placement. You can also include this information in user-defined lists and documents. As yet there is no analysis of this information, so please feel free to request and particular 'pre-designed list' which will display/analyse the Vocational Pathways data.
Version 1.8.14 Released 16th September 2013
One school requested that the date format e.g. '16 September 2013' be added to document design.
Version 1.8.13 Released 31st July 2013
One school experienced a problem in printing a pdf file. A small change has been made to try to avioid this problem.
Version 1.8.12 Released 19th April 2013
One school asked that the student selector only slide out when it is clicked. This enables the person using it to slide their mouse to a second screen on the left without causing the selector to pop out again. This is switched on and off via a new panel on the bottom right of the Configuration screen.
Version 1.8.11 Released 2nd April 2013
A couple of requests have been received recently and these have now been added to the program. They involve two new sample documents relating to placements.
1. The first is named 'Learning Plan Sample' and generates a document which sets out the learning Plan, Other Assessment Notes and a table of Visits information.
2. The second is named 'Placement Report Sample' and this sets out a table of standards pursued as a part of a placement. This table has a total of credits taken and achieved at the bottom.
Both of these documents make use of entries under the 'Placements' tab on the 'Select a field' utility when designing documents. It is important to remember that, when PRINTING these documents, you should tick the small box on the printing screen which causes a SEPARATE document for EACH PLACEMENT to be generated.
You are encouraged to modify these documents for your own use.
Both documents are now also available on the student screen where placement-specific documents can be printed. They can be selected from the ‘Print a Document’ button then on the left hand side from ‘Select a user-defined document’ list. They have NOT been added to the ‘Forms Completed’ tab – as you will probably rename the report or design another like it for your own use. When printing from the student screen, please remember to be viewing the placement concerned before electing to print the document.
Version 1.8.10 Released 7th February 2013
What was in the version between 1.8.5 and 1.8.9? Since last July several schools have requested very minor changes which I've made for them but not issued as a genral release.
e.g. for version 1.8.10 one school reported that Notes were not printing properly in User-defined Lists. They are now.
Version 1.8.4 Released 23rd July 2012
A couple of changes have been made to fix a couple of faults.
1. When on the Student's courses screen a fault was occurring if you clicked the new button labeled "Ensure that the current student has all of these standards". This has now been fixed.
2. If a student's NSID number began with a leading zero then it was not being recognised in the Utility to 'Update from Kamar'.
Version 1.8.2 Released 29th May 2012
As if often the case, in spite of testing, a few minor annoyances creep in to any new version. Hopefuully this one corrects any that were there in 1.8.1.
Version 1.8.1 Released 20th May 2012
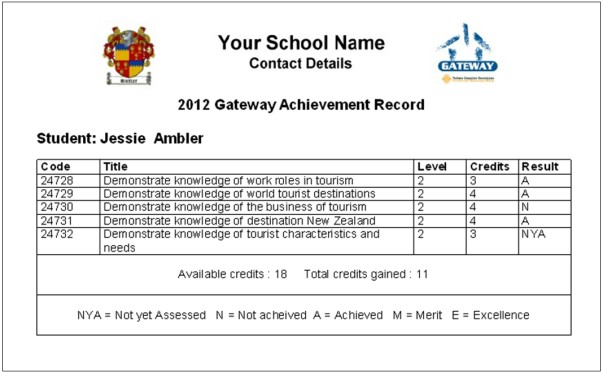
1. Several schools have requested a new standard report component – a list of all standards taken with their results. This has been added as a new document component (It’s the new last entry on the ‘Select a field ‘ / ‘Personal’ list. It is labeled ‘List of all standards’. It results in a grid such as the one below.
To assist and as a guide, I’ve added a new document titled ‘Sample Standards Report’. I’ve not included a logo in the design – that’s over to you to add your own logo. You'll find this new documents in your list of documents.
- If you copied a placement from one student to another, sometimes the new placement got a different employer.
- Changes made to a course didn’t always get applied to all students taking that course. This included standards, other assessments and costs. Sometimes they DID get copied – and duplicated!
- Users given ‘View only students’ rights – along with one or more only rights – were finding that they had FULL editing rights to students. Woops. That has been stopped.
- At the very top of the main screen a new pulldown menu allows you to go directly to the TEC ERS logon screen. (You must, of course, be on-line to do this.)
- A new Main Menu button allows you to access the package manual via the Worsfold web site. (You must, of course, be on-line to do this.) The manual is somewhat out of date but we are hoping to replace the manual by on-line video clips in the not too distant future.
- Students can now have their photograph displayed on the ‘Overview’ screen.
- IES and PCSchool have recently provided the facility to export a ‘worsfold.csv’ file similar to that provided by Kamar. Integris were approached to do the same but they have indicated that a) it was too difficult and b) in any case, they are withdrawing from the NZ SMS market.
- You can globally allocate student email addresses. This is useful if your school has allocated an internal email address to each student. The address format can be selected from a range of possibilities (let me know if yours is not on the list) and you can also specify the right hand part of the address (e.g. ‘kairakau.school.nz’.
- Most schools visit Configuration / Expenditure Management and click the large button at the bottom of the screen to have all student costs accumulated on to that screen for the purpose of the TEC report. It is now possible, via a new setting in Configuration, to have this accumulation process performed automatically every time you visit either the Expenditure Management screen or the TEC report printing screen under Lists.
Some schools, however, may well wish to NOT have this automatic accumulation occur. They wish to record certain costs on students and to record other total costs on the Expenditure Management screen – as distinct from those on students. These schools would elect to leave the automatic accumulation switched OFF. (OK Melinda?) - User Defined lists has been expanded to include the ability to design a list relating to ‘Placements’.
- One school requested that it be possible, when printing a user-defined list of employers, to include employers from previous years. This is now possible – and it is advisable to add a new column ‘Year’ when designing an ‘employers’ list – if you elect to include employers from previous years – which you can do via a new printing option in the centre of the screen.
- The fourth Pre-designed list, Include standards and other assessments’ has had the ‘bottom line’ summary of student achievement added to each student’s display.
- A new Pre-designed List – ‘Placements and their details’ has been added at the bottom of the left hand column of lists. Have a look at this as you might find it a useful list.
- Student photographs can now be included in user-defined documents. There are three possibilities – left, centre and right aligned.
- A button at the top of the TEC report screen allows you to have the report saved to the desktop as a pdf file.
- If you included student notes in a user-defined document then they were not appearing very nicely, as line feeds were being ignored. They should be much more nicerer now.
- The End-of-Year process has been changed slightly. You can now elect to have all of your employers set to ‘Current’ or to ‘Non current’ or you can leave them unchanged.
- The ‘Make a backup’ routine has been replaced with a ‘Copy your Database’ routine. You should be having regular backups of your gateway database made through your school’s backup system. However, you can now copy your current year’s Gateway database to any other disk drive / directory of your choice. This could, of course, include a USB drive – although I’ve found that the copying process can take a while – depending on the speed of your USB port used for the drive.
- ‘Email a database’
- Date given
- Completion Due
- Sent for marking
- Completed?
- Resubmission date
- Resent Date
- Update all standard details
- Update student details from MUSAC
- Start Course management
- Future Indicative (Careers Management)
- A set of menu items providing access to the Worsfold Software website have been added to the main menu across the top of the main screen.
- The full list of ‘Areas of Study’ has been downloaded from the TEC website. This will automatically replace the list of entries which you have created manually. You can still add further ones of your own should that become necessary.
- Employers now have a tick box to indicate whether or not they are ‘current’ and you can include or exclude non-current employers from lists. They also have a new ‘category’ for which you can provide your own list of possibilities. Then, back on the student’s placement screen you can click a pulldown to the left of the employer to have just those in a particular category displayed.
- The achievement summary now lists standards up to level five.
- .
- You can now delete costs from students if they are incorrect. That’s useful! Right-click on the offending entry to remove it.
- Each student’s Date of Birth and ‘Caregiver salutation’ are now imported from MUSAC and from Kamar as they are ‘brought in’. In the case of MUSAC the emergency and caregiver details are also automatically filled in on the Medical screen. The caregiver Salutation (e.g. Mr & Mrs J T Butler) is stored on the ‘Medical and Contacts’ page.
- Students (like ‘Sting’ and ‘Madonna’) can now have no first name. They must, however, have a family name.
- You can now record details of student’s transport arrangement to and from placements.
- You can now record details of items loaned to students (via their ‘Notes’ screen.
- You can copy a placement from one student to another using a new button at the bottom of the placement screen. When you click the button the placement is memorized and then when you go another student you are offered the chance to attach it to the new student. Of course personal details such as costs and results are NOT copied across.
This process can even be used to copy a placement from one year to another. Select the placement you wish to copy and click on the ‘Copy’ button at the bottom of the screen. Then switch to another year via the ‘Change to another year’ menu. Then select the student from that year and you will be able to attach the copied placement. - On each placement screen there is now a place to record the outcome of the placement.
- Each student cost must now have a cost category associated with it (e.g. Equipment). This is to enable a new process which amalgamates all of the costs from students into a costs summary in preparation for the financial returns. (See second illustration above)
- When attaching unit standards to a placement or to a course via the standards selection screen you can now type in the number of the standard for which you are searching via a small text box at the top of the search screen. This speeds up the process considerably.
- You can now attach Achievement Standards to a placement. To do this type in the number of the Achievement standard and you will be asked to fill in the rest of the details via a small window. Since these standards are NOT help in the standards table of the database you must enter the title etc yourself.
- The student comment area on each placement now automatically expands when you click on it. It will reduce back to normal when you click away – somewhere else on the screen.
- You can now remove unit standards and/or other assessments from a student’s course without having to remove them from the course itself. (Right-click on the offending assessment to do so). This does come with a warning that if you were to later alter the course concerned (e.g . by adding another unit standard) then all standards and assessment would be reattached to the student. Where courses are concerned it is assumed that every student is talking every standard and assessment. If not, then you should really put an X as their result to show that they have withdrawn. However, if you insist, you CAN now delete individual standards and assessments from student’s courses.
- One person wanted to record ticks against documents for a placement even though a placement had not yet been specified. Apparently she was in the process of preparing for a placement which she hadn’t finalized and wanted to generate the documents and record them even though there was no placement in place! You can now do that too!
- Courses can now have default costs entered against their unit standards and other assessments. These will come through on to the students taking the course and can thereafter be modified for individual students if necessary.
-
Printing
- You can now save lists as pdf files, should you so wish. These are useful if you have to email a list to someone. Actually, there are now three useful directories under \gw which are used for saving files.
These are used automatically by the various processes (sending returns, printing documents etc). These are :
- Emailed returns
- Emailed documents
- PDF Documents
- When you are printing a document from the student’s screen you may now tick the option to have the document automatically emailed to the student as well as printing.
- There are several more ‘Pre-designed Lists’
- You can now print lists of students out on particular dates. (This list can include details of transport arrangements in case, eg, you have to cancel several taxis!)
- You can print lists of employers with or without their placements
- You can print a list of providers
- You can print a list of items out on loan to students.
- When designing a document you can now insert codes to generate
- Your school’s name
- Today’s date e.g. 28/08/2008
- Today’s date e.g. Thu 28 Aug 2008
- Gateway Programme Number
- Investment Advisor
- You can now tab in documents! I found out how to do it! The tab key can be used to jump across the page in steps, allowing you to line things up a little bit more nicerer.
- There are two new ‘standard documents’ relating to placements.
- The ‘Withdrawn’ document
- The ‘Change’ document
- Under utilities there is a new button which allows you to send an email to all students or to all employers. It does this by gathering all of the relevant emails and putting them into the Windows Clipboard, ready for you to paste into the BCC area of your email program. Instructions are provided within the routine itself.
- The Gateway Programme Number has been added to the package and this is now reported on lists. It can be added via the Configuration screen.
- Costs management The process of managing costs for the purposes of the return has been modified somewhat to allow you to record both Overhead costs (those not associated with a particular student) and Expenditure (totals of costs relating to students). Both of these are managed via the ‘Configuration’ area where there are now two tabs.
a. Expenditure Overheads
The first tab allows you to record overhead costs and it is here that you will see any costs which you had previously entered into the package. Should any of these entries relate to students then you might wish to remove them from this area. -
b) Expenditure management
The second tab allows you to record a summary of student specific costs. It also displays the overhead totals in a separate column. Now the good news is that at the bottom of the screen there is a large button which, if you click it, and after giving approval, the program will run through all of the students gathering all of their costs (student costs, course costs, unit standard costs, other assessment costs etc) and will report them all on this screen, automatically filling in the totals for each cost centre.
This is why it is necessary to specify the cost centre (e.g. Equipment) when recording costs against students. N.B. All costs relating to unit standards and other assessments are automatically recorded under the ‘Assessment Costs’ centre.
If you choose NOT to click the button to have student costs amalgamated then you are still able to enter student related costs in the usual way – by clicking in the centre and specifying the details of each expenditure. However, please realize that if you later DO click the button to amalgamate costs recorded against individual students then this screen will be cleared of all previous entries prior to the gathering process.
There is a ‘Help’ button on this screen which displays further explanation of the process.
- A nice summary of statistics similar to that produced for the Star Funding report.
- The ability to print an individual student schedule.
- From the main menu select ‘Printing’.
- Select ‘External programs’.
- Select ‘Export to Worsfold’
2. At the request of one school three fields from the Placement’s ‘Withdrawn’ tab (Employer, Contact and Phone) have been duplicated on the ‘Outcome’ screen.
3. Now, when you attach a logo to a document, the document is automatically saved and the message about ‘the document already existing – do you wish to overwrite?’ has been removed.
4. The word ‘Unit’ has been removed wherever it appears as ‘Unit Standards’ as Gateway may also include achievement standards.
5. A crash which occurred when removing an employer from the list of employers has been fixed.
6. A new item has been added to User-Defined Lists. Under placement-based lists you can now select ‘Goals/Tasks’ and this will result in a list of all of the goals/tasks which hve been set for a student under the Learning Plan area of each placement.
7. A number of minor screen adjustments have been made to improve the ‘grammatical correctness’ of the package.
Version 1.7.17 Released 2nd December 2011
1. One school had a nice idea which is worth passing on to all - if you go to Print Lists / Individual Student forms you will find a new process whereby you can print all of their TEC Gateway results forms in one go.
Version 1.7.16 Released 24th November 2011
1.Two schools reported a problem losing standards attached to students. One reported losing results as well. Course standards will automatically be removed from a student if they are found to already have that standard on another course, as students cannot take the same standard twice. If you enter results on a student then go to another student and then back again then it LOOKS as though thwe results have disappeared - as the course is no longer displayed. This is compounded by a blue highlight on the first course so that it LOOKS as though it is selected. I've now changed all that!
There is now a new button just about the students display of standards attached to a course. Clicking this button will cause any standards NOT attached to the course in question to be removed and all standards which ARE attached to thecourse to be reattached if they are missing.
I'd like to add an auto-update of results (from MUSAC or Kamar) to this process but I haven't done thet yet.
Version 1.7.15 Released 11th November 2011
1. If you wish to print a document for each of the employers then you can now do that. The document design should include only employer details as it will not be printed per student. When you go to print you can now select for either students or
Version 1.7.14 Released 7th November 2011
1. When printing the 'Student standards result summary' you now have the choice of including just those standards attached to the placement selection or of ALL standards achieved by the student in question.
Version 1.7.13 Released 25th August 2011
1. Three new fields have been added to those you can include in user-designed documents. The first is the 'Placement Outcome Code'. The other two are empty tick boxes - one aligned to the left of the page and the other to the right. These enable you to generate placment- or student -specific questionnaires.
Version 1.7.12 Released 31st July 2011
1. A warning to Kamar users about the date of the last worsfold export has been added to the main screen.
2. Latest standards file included.
3. Some improvements to the process of updating standards results from Kamar.
Version 1.7.11 Released 9th April 2011
1. Placement 'Day' has been added to the list of fields which can be included in user defined lists and documents.
Version 1.7.10 Released 21st March 2011
1. A change has been made to the photograph display routine so that photographs are automatically resized to fit the viewer frame. (The actual photograph files are not adjusted - just the display process)
2. A new column has been added to the Pre-designed list for 'Placements and their details' to now include the date and time of the placement.
Version 1.7.9 Released 15th February 2011
1. The same school then reported that achievement standard results where not appearing on other documents either - and I found many places that they were not being reported.
2. The small pull-down menu which appear to the left of the 'employer' selector when adding a NEW placement was not working. It is now, and enables you to select just one area of employer categories from which to choose.
Version 1.7.8 Released 10th February 2011
1. This version includes a minor change for one school - who spotted that achievement standard results were not being counted in the achievement summary.
Version 1.7.7 Released 13th September 2010
1. I recently received a call from the TEC asking that I modify the various TEC forms as several small changes had been made to their forms. These changes have now been made.
2. A fault was discovered in the 'Global Update from MUSAC' process under utilities which caused the program to crash rather than to perform the update. This has also been repaired.
Version 1.7.6 Released 11th August 2010
This is a non-essential update. I've had several requests lately so I've put them together as version 1.7.6.
1. Recently added is the ability to select a photograph file name based on students' names. There are about 20 new possibilities! The last four add the letters 'PC' in front of the numerical codes - which are used by some schools.
2. One school reported that the achievement summary was duplicating standards where a student had been allocated to a course and then removed from it and then added back again and so on. Dulicates are now automatically removed.
3. Under Pre-designed lists the list titled 'Placement Details' (bottom of the left hand side) has now had 'Start date' added to the display.
Version 1.7.5 Released 3rd August 2010
1. I've had several requests lately for the new TEC form titled 'Gateway Unit Results' to be added to the package. It is now there and is the fourth TEC form available for printing once you have selected a student's placement and clicked on the blue 'Forms signed' pullout in the top right hand corner of the student's placement screen. You also have the option whether or not to include the student's results (and other unit details) on this printout. You should elect to NOT include the extra information if you are printing the form for TEC as they do not require the level, the result and the credits gained for each standard.
Please note that this report WILL include any achievement standards taken by the student as a part of the placement (or attached course) concerned.
2 The audit trail, which was added recently, has been expanded to also record when a placement and/or course is added to or removed from a student
3. Once school is using the document design process to produce nice certificates for their students. To do this they wished to be able to include a table of standards and their results for the placement being printed. This can now be done by including, in the document design, the code for 'Units list with results' which is available under 'Placements' when you are selecting a field to include in the document design.
Version 1.7.4 Released 25th July 2010
One school has indicated that they 'lost' students from the gateway database. No other schools have ever reported this and, while I hesitate to suggest that it is 'user error' I can find not other explanation for the deletion of students. One checking the database I found that the students had been removed 'tidily' - i.e. the student along with all placements, courses, unit standard results and course outcomes (all of which are stored in separate places in the database) had all been removed. There is only way in the package where this happens and that is by clicking on the 'Delete this student' button and by typing 'Yes' in response to the warning which follows.
As a result I have added an audit trail to the package which records each time a student is added to or deleted from the database. The contents of this audit trail can be viewed via a new button under 'Utilities'. This will enable the use to see the date and time and name of the person doing the addition or deletion.
Version 1.7.3 Released 18th July 2010
Three minor faults have been reported since the last major upgrade and these have now been repaired. Thy are, or were:
1. The new button to show provider details was sitting in front of one of the popup windows.
2. In user-defined lists - the right-alignment > symbol was not being interpreted.
3. The student's date of withdrawal was not 'sticking' i.e. it was not being saved to the database.
Version 1.7.2 Released 17th June 2010
A number of small faults appeared in version 1.7.1 - as is not uncommon with a major new release. These have now all been repaired.
In addition, under 'Print Lists' / 'Pre-designed lists' / 'Student by student standards summary' (The top one on the right hand cide), the provider and provider code have been added to each of the standards.
Version 1.7.1 Released 8th June 2010
During the twelve gateway seminars held in Greymouth, Nelson and the North Island during May and early June over nine pages of my Gateway book were filled with 91 requests for changes and enhancements. Many were minor screen changes and a few were bugs (three are reported below). A couple didn’t make it through and these are also listed below so that those who made them can snarl at me.
Bug fixes
Standards file
The new download includes the latest file of standards from NZQA.
Main Menu
Students
Of course, it would take a long time to individually attach each student’s photograph, so a bulk method has been provided under Configuration – see below for details. A ‘…’ button near the photograph reveals four further buttons which you can use to resize the photograph frame. Click the ‘…’ button again to hide the resize buttons.
Once a photograph has been attached to a student you can see the name of the photograph file by hovering the mouse over the photograph.
2.
A new category (Learner) has been added to the Drivers License possibilities.
3. New fields have been added so that you can record email addresses for each of the two caregivers. (These are now included in the database import for MUSAC schools.
4.
As from 2011 two new columns (Date and Person) have been added to the student notes screen. This could not be done part way through a year so it will turn up automatically next year.
5. Assessors
Go to Configuration / Popups and you can now enter details relating to each of the assessors who asses your students’ standards. Each unit standard can now have an ‘Assessor’ attached and there is a new column in each table which allows you to record this. A popup menu of assessors appears when you click in the ‘assessor’ cell on the table. Once an assessor is in place in one of these tables you can view full details of an assessor by right-clicking on their name.
6. Providers
You can now record full contact details for each of your providers. These details are entered either via the usual provider details screen or via Configuration / Popups / Providers. You might well have previously provided some details for providers of courses and these have been kept and attached to the relevant provider.
Once a provider’s details have been entered they can be viewed by right-clicking on the name of the provider in the standards tables.
7. Click on the blue slide on the bottom right hand edge of the Placements screen labeled ‘Learning Plan details’ for a particular placement and you will now be able to record who has been involved in each workplace visit. The choice is now ‘School’, ‘Work broker’ or one of the specified assessors. (see above)
8. When printing the ‘Student Gateway Enrolment (TEC)’ form you can now elect to have either the employer’s physical or postal address included on the form. This choice can be made via a new frame on the ‘Configuration’ screen.
9. When importing students from either MUSAC or Kamar (or IES or PCSchool)) a new button allows you to import an entire class of students in one go. Click on the button, select the class concerned, and all students in that class will be added to your Gateway database.
10. If you use the ‘Back’ and ‘Next’ buttons at the bottom left of the student screen to move between students then they now leave you one the same page as your were viewing for the student you were previously viewing.
11. Each student’s ‘Local school ID’ is now visible near the bottom left hand side of the student data screen. Frequently students’ photographs are named according to this number and you can now check this.
12. The ‘Times note’ field, which was renamed to ‘Hrs/week’ for the TEC documents has been reinstated as a new field. All of these fields can now be included in user-defined documents and lists.
13. If you add a new ‘other assessment’ to a course then an abbreviation is now automatically created and entered for the new assessment. You can, of course, then change it to something more seemly if you wish.
14. The unnecessary ‘Location’ column has been removed from each standard in the various standard tables. It was wasting space.
15. When you enter a placement’s start date the ‘Day’ will now fill in automatically.
Configuration
Lists
Utilities
This process, which no longer works following Microsoft’s security enhancements, has been replaced by a full set of instructions. These are the instructions which I have been emailing to those wishing to email me a copy of their database – for diagnostic purposes. Basically, the process involves a) making a copy of the database b) renaming it to a .txt file c) zipping it up and d) emailing it to me. The instructions can be printed out and passed to your IT person if necessary.
4. Import NZQA standards
This process has been sped up by showing only every fiftieth standard.
5. Send emails
This routine now includes three extra buttons to enable you to send a bulk email to a) all first caregivers with emails, b) all second caregivers with emails, c) all caregivers with emails.Version 1.6.5 Released 22nd February 2010
1. I accidentally left a test script in the routine which imports students from Kamar. As a result every student's surname on the import list nows appears as 'that. I had not intended for that to happen.
2. In making it possible for course standards to be included on the Enrolment Form, I accidentally stopped all but the first placement standard from appearing. They all appear now.
Version 1.6.4 Released 17th February 2010
1. The Three Month Student Outcome form has been added. This is accessed via a new button under 'Print Lists'. The screen will display ALL students and their placements. The left hand column shows dates of previously submitted placements. Click in blank cells in this column to have today's date entered and only placements with today's date in this column will be printed on the form. You may also fill in missing details in the columns labelled 'Outcome Code' , 'Employer/School/Tertiary', 'Contact person', 'Contact number'.
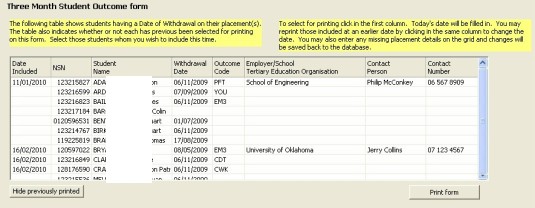
As you click 'Print form' the form will be generated and any changed details will be saved back to the database.
The form (and others) may now be saved as pdf files by clicking the new ‘Save as pdf’ button at the top of the viewing screen.
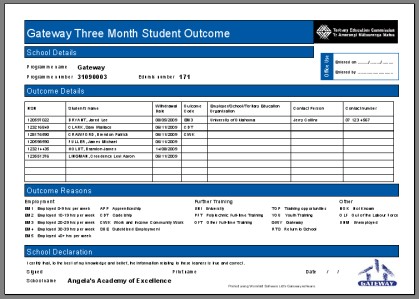
These new details may also be entered against each students' placements on the 'Withdrawn' tab on their placement screen.
2. I've had several requests to be able to associate one or more courses with a placement - so that units included in associated course(s) are included in the new Student Enrolment Form'. A new pulldown menu has been added on the course screen, beside the course title, to indicate which of the student's placements the course is attached to.

Subsequently, when you print the Student Enrolment Form, any standards attached to these courses will be included along with the placement's standards.
3. A nasty fault in saving placement changes - which was corrupting costs - has been identified and fixed. This was reported by three schools at the end of last year. Everything was fine and costs were saved correctly as they were entered, but the 'Save Placement Changes' button had a fault behind it which was corrupting the data. It has now been found and fixed. Again, my apologies for any inconvenience.
Version 1.6.3 Released 2nd February 2010
A fault preventing students' placement costs from being displayed has been fixedhas been fixed.
Version 1.6.2 Released 2nd February 2010
A fault found in the 'Update from MUSAC' process has been fixed.
Version 1.6.1 Released 27th January 2010
The following enhancements have been made to the program
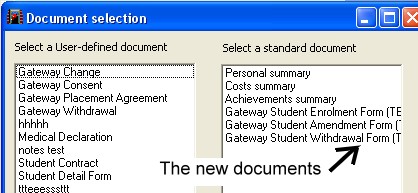
1. The main enhancement is the inclusion of the three new TEC forms :
Gateway Student Enrolment Form (TEC)
Gateway Student Amendment Form (TEC)
Gateway Student Withdrawal Form (TEC)
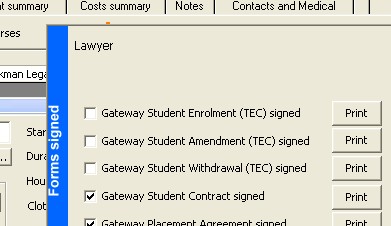
Each of these forms may be printed from two places via the students’ screen.
a) Go to a particular student and select a placement. Then click on the Blue ‘Forms signed’ tab in the top right hand corner of the screen. The first three entries on this screen allow you to print the new forms.
b) As before, select a student and then a placement for that student. Then click on the ‘Print a document’ button in the bottom left hand corner of the screen.
Be aware that some details may NOT be automatically filled in on the form. This relates particularly, of course, to the Amendment form, but also to certain fields on the others.
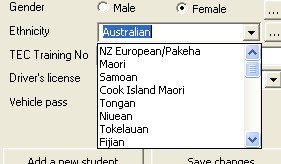
2. Student ethnicity.
TEC have recently requested that the full MOE range of ethnicities for each student be made available and you may now make your selection for ethnicity from the full range, using the popup selection list which displays each student’s ethnicity.
3. Outcome code
A further new field, required for the completion of the ‘Three Month Student Outcome’ form is the ‘Outcome code’. This may be selected, for each placement, via a new selection popup list on the ‘Outcome’ tab for each placement.
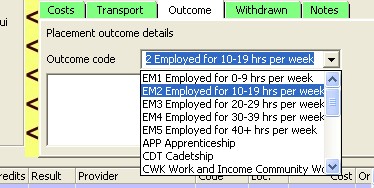
The ‘Three Month Student Outcome’ form will be made available before it is first required early in 2010.
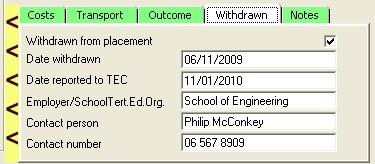
4. Placement Notes
Further, a new tab ‘Notes’ (visible in the illustration above) provides an area where you can record information relating to the placement concerned. e.g. Conversations with the student or the employer.
5. Employers – lists and emails
When printing a list of employers (via ‘Print Lists’ / ‘User-defined lists’) or in sending emails to all employers (via ‘Utilities’ / ‘Send emails’) you may now elect to include ALL employers or only ‘Current’ employers. (A current employer has their ‘Current’ status ticked on the employer definition screen).
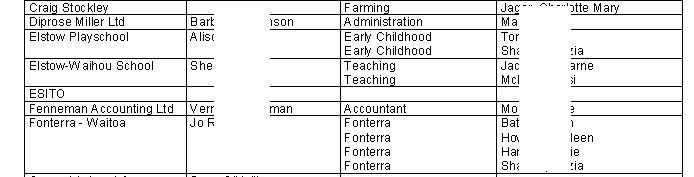
6. Student and Placement in list of employers
When printing a user-defined list of employers you may now include either or both of two new fields : ‘Students’ and ‘Placements’. These will cause a list of the students relating to each employer and/or their placements to be included on the list. See the example below wherein names have been hidden by being partially erased.
7. How to install instructions
I've been aware for some time that the instructions on how to download and install an update have detailed one of the two possible appearance of the extraction process. I've no managed to obtain illustrations of the alternative process and these have now been added to the instructions at http://www.worsfoldsoftware.co.nz/WSGWHowtoinstall.html
Version 1.5.4 Released 12th October 2009
Kamar has released a new version of their worsfold export file. This version contains more information relating to each student. A new utility has been added to match that available for MUSAC schools. The new utility is visible now for Kamar schools and allows you to globally update data relating to all standards and to all students. Latest information concerning results and student data can be globally imported from the new file worsfold.csv file.
Version 1.5.3 Released 14th September 2009
A small fault in the display of costs for courses and placements has been repaired. This caused one school to lose the costs which they had entered. (The costs were still there but were not being displayed - so that on saving they disappeared. Woops... all fixed now.
Version 1.5.2 Released 11th September 2009
The following enhancements have been made to the Gateway package.
Students
1. There is a new document available titled ‘Student Detail Form’. This has been requested by several schools and is a two-page document which follows the format on that provided by the TEC and lists :
Personal Details Learning Plan
Student declaration Additional Information.
Placement details
2. If a change is made to the costs of a course through the course definition screen then this change is now carried through to all students taking that course.
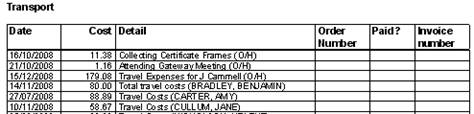
3. Three new pieces of information (‘Order number’, ‘Paid?’, and ‘Invoice number’) have been added to every area where costs are entered. (These include student costs, unit standard costs, course costs, overhead costs etc). These are also now reported via the cost screens.
There is not a lot of room on the screen to display these extra columns so some arrows have been added which enable you to slide the extra columns out into the display area. Re-clicking the yellow strip of arrows will slide them back in again. Both the ‘In’ and ‘Out’ versions are shown below.

Please note that the use of these columns is optional. If you wish to turn them OFF then you may do so via a new item under ‘Configuration’.
4. When you attach standards to course and placements :
a) You can now select Achievement Standards as well as unit standards.
b) The Domain is now shown for each standard in the selection panel.
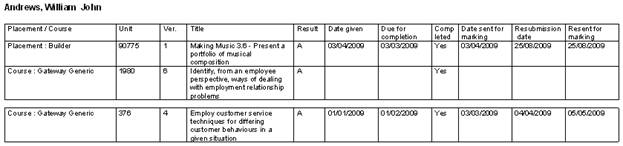
5. A series of Date columns have been added to each of the displays of standards. These columns are :
The fourth, ‘Completed’, is not a ‘Date’ column. It toggles between ‘Yes’ and ‘No’ when you click in it. The other five are all ‘date’ columns. To quickly enter the current date just right-click in the column and the current date will be automatically filled in. If you edit this to another date then this will be then remembered as the ‘current date’ for further right-clicking in other columns.
These six columns can be turned On or Off via the new Configuration item.
6. If, on the Placements screen, you slide out the blue ‘Learning Plan’ tab on the bottom right hand side of the screen, you will see a new table where you can list visits made or to be made to the student on site.
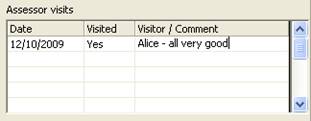
.
7. Two new fields have been added for each student. They are ‘Driver’s license’ and ‘Vehicle pass’. The first is a pull-down menu with three options : ‘None’, ‘Restricted’ and ‘Full’, and the second is a simple tickbox to indicate whether or not the student has a vehicle pass.

These new fields can be added to student documents and the new user-defined lists.
8. Several schools reported that the ‘Next’ button recycles through students after a certain number. That was a very tricky one to solve but it started recycling when it came to a student with no placements. It’s all fixed now.
9. Several data fields on students imported from MUSAC did not have the data ‘stick’ when imported. These fields related to medical and caregiver information. The new utility to update data from MUSAC reinstates any missing data.
10. The line being currently viewed in the costs or standards tables is now highlighted.
11. If you print a document for a student from the student screen the document will now be displayed in a preview screen prior to sending it to the printer.
12. Some users like to add a ‘category’ to their employers so that when selecting an employer for a new placement they only have to select from those in a nominated category. These categories have been standardized to match the TEC categories into which each placement falls. (You can still edit this list of categories as necessary).
13. Placements can now occur on a ‘Tue-Thu’ day combination – as well as any other two-day pair.
14. If a new unit is added to a particular placement on a student then you will be given the opportunity to automatically have this unit also added to all other students who have a placement of the same name.
15. Some schools have used the ‘Notes’ area to store a photograph of each student. This can be done by cutting and pasting the student photograph from an external source into the ‘General notes’ area for each student.
Edit Users
If a user had been given just the ‘View only’ option to allow them to view but not edit student information – then they COULD still edit data. They can’t do that any more.
Configuration
1. There are two new ‘switches’ which allow you to turn the use of columns off or on. The two sets of columns are the new cost columns (Order number, Paid and Invoice number) and the new Date columns from the lists of standards.
2. If you alter a student’s costs at any time then a signal will be sent to ‘Configuration’ so that, next time you enter the ‘Expenditure Management’ area the following message will be displayed, warning you of the need to reimport student costs.

Print Lists
1. There is a new document available titled ‘Student Detail Form’. This has been requested by several schools and is a two-page document which follows the format on that provided by the TEC and lists :
Personal Details Learning Plan
Student declaration Additional Information.
Placement details
2. A new financial report, which provides a full listing of all costs, is now available as a new button under ‘print Lists’. This list may be sorted either by Cost centre (e.g. below) or by Order number.
3. Some employer fields (e.g. ‘Physical Address’) were not coming through correctly on documents. They are now.
4. There are several new ‘Pre-designed lists’.
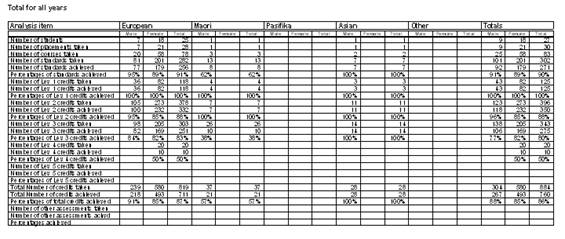
a) A Gender by Ethnicity Analysis. This takes four pages, one for each of the years 11, 12 and 13 and a fourth which shows totals for all years. An example is shown below :
b) A list of standards with progress dates
This lists each standard for each student along with any entries in the six new columns.
c) A list of standards with progress dates within the next ??? days.
Enter a number of days (e.g. 7) and the list will only include references to standards where one or more of the dates occur(s) within the next specified number of days.
d) A list of standards which are still incomplete even though the ‘Completion due’ date has passed.
e) A list of placement visits made.
f
) A list of placement visits due in the next ??? days.
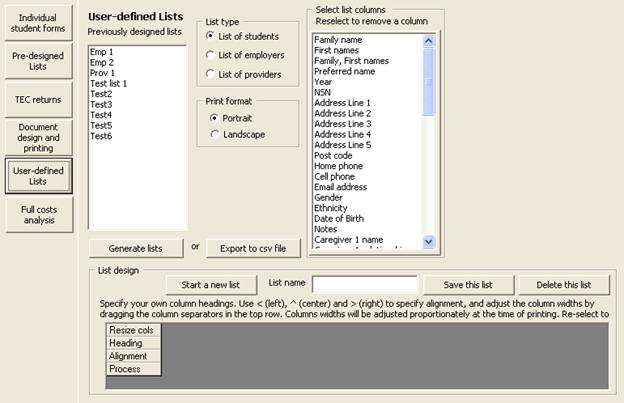
5. User defined lists.
You can now design your own lists of students and their data, Employers and their data, or Providers and their data. The screen initially looks like this :
Initially you will not have any previously designed lists listed, but I’ve been doing a fair bit of testing.
To design a new list click on the button labeled ‘Start a new list’ then type in a name for your list. At the top of the screen decide which of the three options applies to your list : students, employers or providers. As you make the selection the relevant list of fields will appear on the right.
Next, select those fields on information which you wish to appear in your list by clicking on them and they will appear in the grid at the bottom of the screen. In the example below I’ve designed a list of employers.
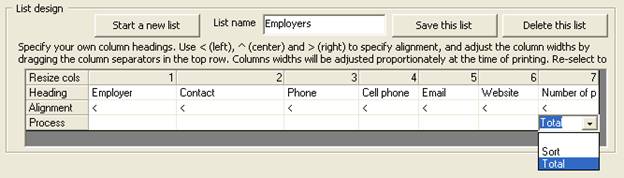
I’ve altered the width of the first three columns by grabbing and sliding the column gap just to the right of the column numbers.
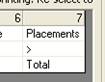
I’ve also decided to have the total number of placement printed at the bottom of the last column. Its title ‘Number of Placements’ can be edited and the column can also be right-aligned, as shown below.
Finally, ‘Save this list’ and it will be added to the list of lists on the left hand side of the screen.
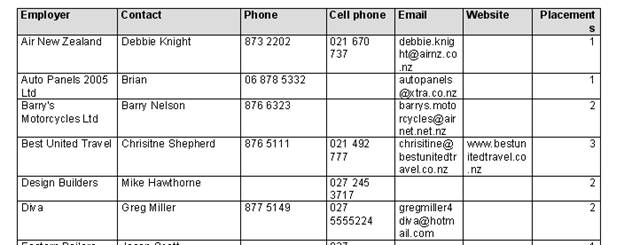
Once there, select it and then either print it (by clicking ‘Generate this list’). An example of such a list is shown below.
.
Alternatively, you can send the contents of the list to a csv file (that’s ‘comma separated variables’). This is a text file in a format which can be open in a text editor or in Excel. If you choose the later you’ll be asked to provide a file name for your export file and given the opportunity to proceed directly to Excel to view the resulting file.
This way you can generate a text file of data relating to student, employers or providers. The numbers of each will be printed at the bottom of each list e.g. :

.
6. When printing documents for students you can now select more than one document at a time. You must hold down the ‘Cntrl’ key while you select multiple documents.
Utilities
1. Update data from MUSAC
This new utility allows you to:
The process will run through every student checking any standards they are taking against the results held in the MUSAC database. Where results are ‘better’ than those already held they will be updated and the progress reported on the screen. (See example below).
This process will do exactly that. It will run through each student checking their data held in the MUSAC database, updating the Gateway database with the latest information.
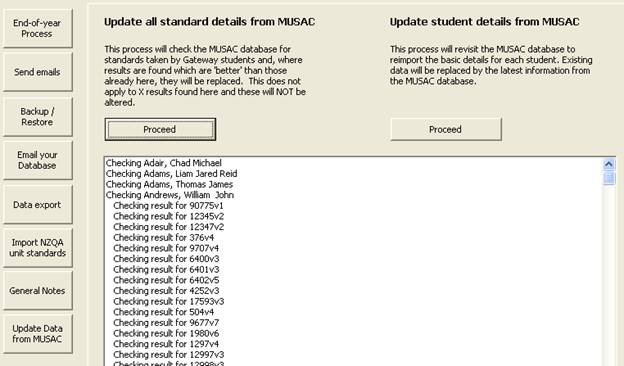
Other
There is a new menu item at the top of the main screen via which you can access information relating to two other Worsfold Software Ltd packages for schools. These are :
.
Version 1.4.12 Released 9th February 2009
A further small adjustment to the costs import routine in preparation for the Returns. In one further case a particular cost was not being trasnferred correctly.
Version 1.4.11 Released 9th February 2009
The new file of standards from NZQA for 2009 has been released and is a part of this download.
A fault has been found in the routine which accumulates costs from student entries. Some standards were doubling up and being counted twice.
Version 1.4.10 Released 14th January 2009
A minor change for one school
Version 1.4.9 Released 10th December 2008
If you had not done the end-of-year rollover to 2009 the program was throwing you out, saying that it could not find the database. This has been fixed and you will, once again, be able to log on.
Version 1.4.9 Released 10th December 2008
The menu to select another database was not displaying one previous year correctly. It is now.
Version 1.4.8 Released 28th November 2008
Three schools have reported duplication of unit standards in the students Achievement Summary. They all report that it was caused by having a student with the same standards attached to a placement and to a course or to two courses and then deleting one of the duplications. However, the duplicated standards attached to the students were still being reported. This should no longer happen!
Another school noticed that one of the predesigned tables was reporting results for those unit standards attached to placements but not for those attached to courses.
Version 1.4.7 Released 25th November 2008
A fault was found in the TEC returns - where the 'cost details' were overwriting the whole document.
You now have to click on the two blude slides on the placements screen to get them to pop out. Previously they were jumping out at you when you least expected it.
A fault in the process of importing a student from MUSAC has been fixed.
Version 1.4.5 Released 3rd September 2008
A small fault was found when adding loaned items to a student and then saving changes.
A second small fault was found in the process of accumulating student costs to the Configuration summary.
Version 1.4.3 Released 28th August 2008
Following the North Island series of Gateway seminars the following changes have been made to the Gateway package. Over 110 suggestions and requests were recorded during the seminars. A lot of them were things that I spotted which I felt could be nicer but many were excellent enhancements to the package. Not all have been auctioned yet. A very few are still on my list of ‘things to do’. The following are the details of those which require explanation.
General
Students
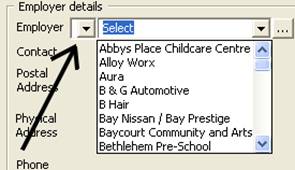
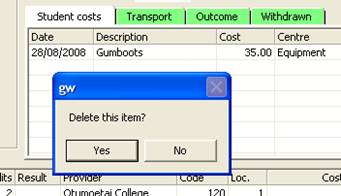
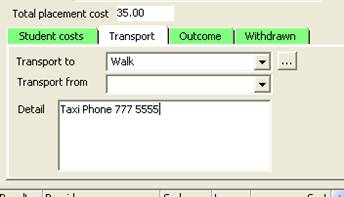
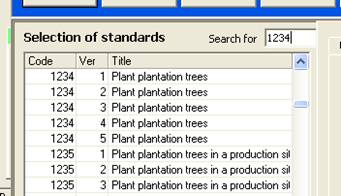
.
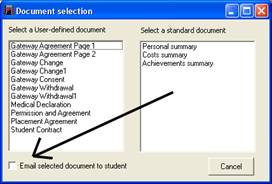
Both of these have a gateway logo embedded (rather than my Worsfold one) and you might like to alter the other documents to include the new logo. I’ve included two Gateway logos with this release. One is a coloured one (gwlogocolour.jpg) and the other is black and white (gwlogobw.jpg). Once you’ve installed the update they will be available via your \gw directory.
Some of the documents may require a little alteration to have the logo in place. I’ve modified the program so that if you right-align a logo then the text will wrap around it on the left hand side.
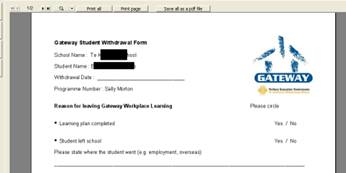
Utilities
Expenditure Management (Under Configuration)
Two of the outstanding requests are :
How to generate the Kamar export file
I have received the following instructions from Kamar :
To export the worsfold.csv file :
.
.
Version 1.3.3 Released 27th July 2008
The following enhancements have been made to the Gateway program since its last major release in February
Accessing the website
A new top-line menu item now provides you with direct access to the Worsfold Software website. This is next to the ‘Select database’ menu item at the top of the main screen. It is intended that this process will be developed further to allow you to install an update more directly in future. The main problem with this to date has been the firewalls in school which (wisely) prevent the unauthorized downloading and installing of programs without IT approval.
Students
- Learning Plan
There is now a second slide on the right hand side of the Placements screen, as shown below.
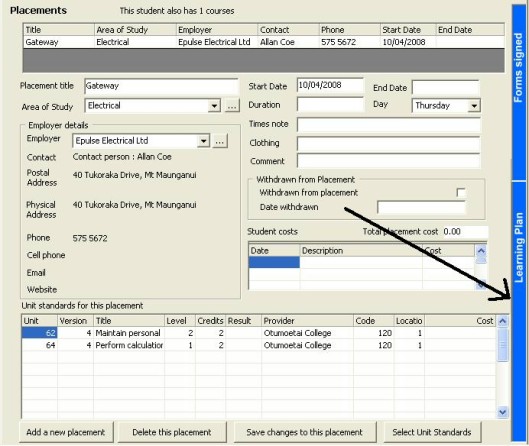
This slide open up the following screen :
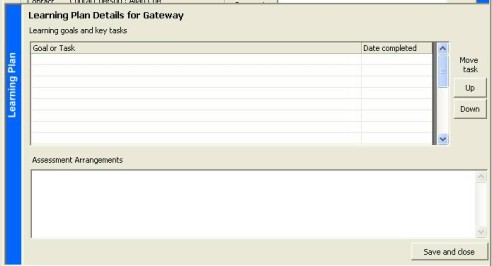
On this screen you can record both the specific Goals and Tasks for the placement in question (and the date completed) and any particular assessment arrangements that apply. You can use the two buttons at the right hand side to move a selected goal up or down the list.
Once you have finished click on the “Save and Close’ button (or, if you do NOT wish to make the changes then just click on the blue ‘Learning Plan’ strip).
The learning Plan has been added to the list of placement specific documents available via the upper ‘Forms signed’ slide.
Items loaned to students
On each student’s Notes screen is now a table where you may record the details of items loaned to students. You may record the item, the date loaned, the course or placement with which it is associated, the date returned and the item’s value.
- Date of Birth
This detail has been added to each student’s details screen.
- Second Emergency contact
A second emergency contact has been added to each student’s ‘Medical’ screen. These details may also be included in user-designed documents.
- Placement/course day.
The choice of ‘Various’ has been added to the list of possible days on which a placement or course takes place.
- Dots in Dates
One person asked if they could put full stops instead of slashes in dates as they liked to use the numeric keypad to enter dates. You can now do that and the program will convert them back to slashes for you. So, if you enter e.g. ‘5.7.8’ it will be converted to ‘05/07/2008’.
- Editing students : Back and Next
Two new buttons have been added at the bottom of the student screen to enable you to jump to the previous or next student without having to pull out the student selection slide.
- Emailing students and employers
The two ‘Email’ labels – for the student and for the employer on the placements screen – have been replaced by buttons labeled ‘Email’. Provided that there is an email address specified, you may send an email to either the student or the employer by clicking on this button. You will arrive in your email program – provided that your system provides you with the right to do so.
- Popups are now sorted.
Well, most of them are. The popup lists of employers, courses etc are now automatically resorted into alphabetical order each time you add a new entry.
- Combo Type Ahead
A request has been received to have the Day combo react to key presses so that if you type W then Wednesday will automatically been selected. This functionality has been added to the Day (on the Placements screen) and the Ethnicity (on the Student details screen).
- Entry of Unit Standards results
You can enter results from students’ unit standards via their Placements and Courses screens. You can now also enter the results via the ‘Achievement Summary’ screen, where you can see all of the students standards in one place. You can also add ‘Other outcome’ results via the same screen.
- Student results
These can now include M = Merit. A merit result is permissible for certain unit standards. The program does not have access to which particular units do allow a merit result so it has been made available to all. It will be up to you to ensure that you do not allocate a merit result to a unit standard which does not allow it.
Configuration
- Expenditure Management
In order to be able to generate the Ministry’s Funding Summary you need a place where you can record the various operating costs of your Gateway program. To do this, a new tab has been added under ‘Configuration’, as shown below. (Yes, the data is very spurious as I’ve simply been using it for testing.)
.
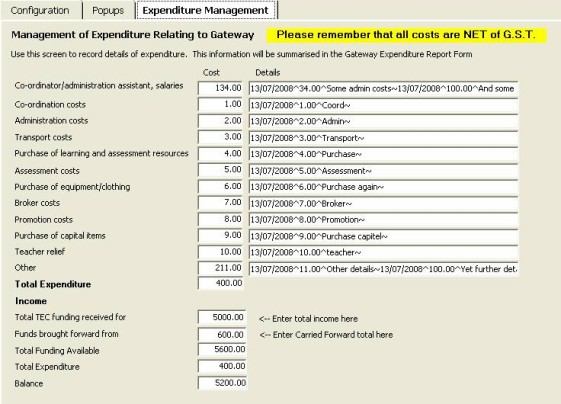
The information on the right hand side looks really strange but, if you click on any of them then all will be revealed. E.g. the first one appears as :
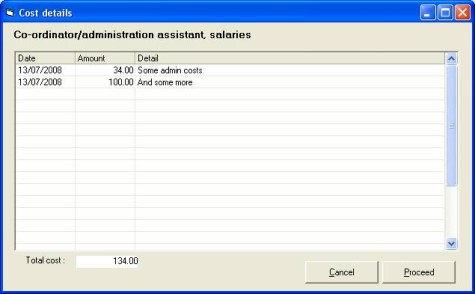
In other words, each area allows you to enter dates, amounts and descriptions. These are totalled automatically and the figures returned to the previous screen.
At the bottom of the previous screen you can enter the total income received and the total carried forward from the previous year’s operations. All of this information will appear on the printed summary as detailed below.
Printing
- Printing individual student documents.
You have three to choose from and you can now ask that they be all printed on one sheet of paper (where possible) rather than on three separate sheets.
- Level 4 unit standards
Woops, I had overlooked those. They are now recognized and reported in the various summaries.
- New list = Forms printed and sent to TEC
A new choice has been added to Pre-designed lists. This one lists each student’s placements and displays whether or not each of the possible forms has been printed and whether or not it has been sent to the TEC.
- The Ministry returns area has now been completed.
Visit the ‘Printing’ area and select ‘MOE Returns’. The following screen will be displayed, via which you can enter details which will appear on the printed report.
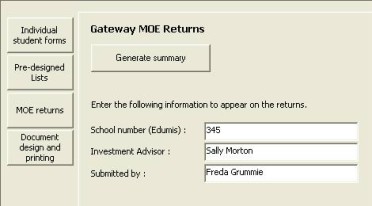
Once you have the information entered (or even before, if you cannot wait) click on the ‘Generate Summary’ button and you will see :
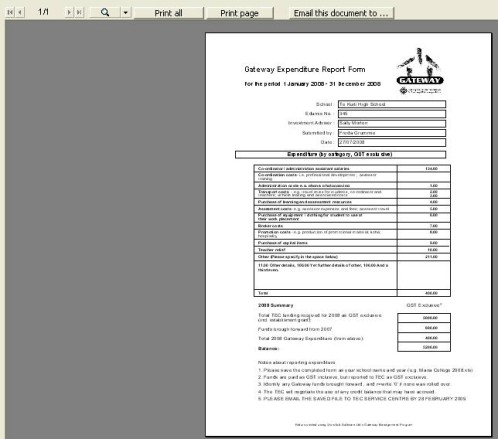
You can enlarge this display by double-clicking on it, and you will see that the various expenditure and income totals, along with the other information required, is displayed on the report.
There is a button at the top of the screen labeled ‘Email this document to…’. If you click on this button then the following happens. A pdf file of the report is produced (and saved into a new sub directory called ‘\gw\emailled returns’. The program then attempts to attach this document to an email in your email program addressed to servicecentre@tec.govt.nz.
I have recently experienced some problems with this process on my computer which, I suspect, has had the operating system modified by Microsoft to prevent the sending of emails with attachments via other programs. This is a security precaution on their part which prevents us from achieving our intentions. The same process has worked for several years via Worsfold’s other software packages, so it may or may not work for you.
If it fails then you will have to create an email manually and attach the returns file named e.g. ‘Butler College2008.pdf’ in the emailed returns directory off your gateway directory (\gw).
- Printing ‘All units’
When designing your own documents you can now include ‘All units – no results’ and/or ‘All units with results’
- Which students are out today?
When printing pre-designed lists you can now request a list of those students who have placements on a particular date. You might need to include the ‘Include various’ option if you have indicated that a placement occurs on the day : Various’.
Utilities
- General Notes
One school asked for a ‘General Notes’ area where you could record ‘things to be done’. It there, as a new button under the ‘Utilities’ area. You can record notes and date them and print them.
Bugs
I’ve removed a couple of faults found by some schools.
You could not delete an assessment from a course. The only way to do it was to delete the entire course and to then re-enter it. However, this left the original assessment still attached to the students and reported on their ‘Achievement summary’. A routine has been added to remove such ‘phantom’ assessments and unit standards.
Future development
I do still have several requests on my list which I haven’t included in this round. So, if you’ve made a request which is not yet included, it hasn’t been forgotten. Never-the-less, feel free to remind me just in case it has slipped through the net.
.
*******************************************************************************************************************************
Version 1.2.6 Released 11th June 2008
Briefly, three schools have reported that their program has no text on the labels, making it impossible to know where to click.
.
Version 1.2.1 Released 20th March 2008
Briefly, three schools have reported that their program has no text on the labels, making it impossible to know where to click.
As a result ALL of the nice new buttons and labels and tickboxes etc have been removed and replaced by the old Microsoft ones. We will continue to investigate the cause of the problem but, in the meantime, this version will work nicely for everyone
The next release will be in June 2008 and will incorporate a number of features requested by those using the package.
Version 1.1.1 Released 15th February 2008
The first version of Gateway was released in Mid-February 2008.
.
Copyright 2008 (C) Worsfold Software Ltd